Picture this: I was in the middle of a chaotic Sunday brunch, the kitchen a battlefield of flour, sugar, and a frantic search for that one missing ingredient. I reached into the pantry, pulled out a can of sweetened condensed milk, and decided to make something sweet that would calm the chaos. The aroma that filled the air was nothing short of a tropical storm—sweet, buttery, and the faintest hint of coconut that made me grin like a kid at a candy store. I was convinced that this little experiment could become my go-to comfort dessert, and I was right.
The first bite was a revelation. The mixture was silky, almost like a caramel drizzle, but with a coconut backbone that made the texture uniquely chewy. The heat from the pan caramelized the coconut, giving it a subtle crunch that popped in your mouth like tiny confetti. It’s the kind of dessert that makes you pause, take a breath, and feel the kitchen transform from a mess into a sanctuary of sweet smells. And the best part? It’s so simple you can whip it up in a flash, but it feels like you’ve just invented a new culinary masterpiece.
What sets this version apart is the sheer authenticity of the flavor. I used a classic Brazilian technique of cooking the coconut with condensed milk until it thickens just enough to hold its shape—no fancy gadgets, no secret sauces. The result is a bite that melts in your mouth, leaving a lingering buttery coconut aftertaste that’s hard to resist. And because it’s a crowd-pleaser, you’ll hear people ask for the recipe after every bite. I dare you to taste this and not go back for seconds—trust me, you’ll want a whole jar of it.
And that’s just the beginning. This isn’t just a recipe; it’s a conversation starter, a quick fix for a sweet craving, and a celebration of simple ingredients done right. By the end of this post, you’ll have the confidence to say, “This is hands down the best version you’ll ever make at home.” Let me walk you through every single step—by the end, you’ll wonder how you ever made it any other way.
What Makes This Version Stand Out
- Flavor: The caramelized coconut and sweet condensed milk create a complex, yet harmonious taste profile that feels both comforting and indulgent. The subtle toasty notes elevate the sweetness, preventing it from feeling cloying.
- Texture: The mixture achieves the perfect balance between chewy and melt‑in‑your‑mouth. The coconut’s natural fibers add a satisfying bite without becoming gritty.
- Ease: No advanced techniques or equipment required—just a saucepan and a whisk. Even a novice can produce a professional‑looking result.
- Ingredient Quality: Using high‑quality unsweetened coconut ensures a richer flavor and better texture, while unsalted butter adds depth without overpowering the coconut.
- Make‑Ahead: The balls stay fresh for up to a week in the fridge, making it an excellent pre‑made dessert for gatherings.
- Visual Appeal: The bright golden color and glossy finish make it Instagram‑ready, turning a simple snack into a showstopper.
- Versatility: Add a splash of rum, sprinkle with toasted coconut, or roll in cocoa powder for endless variations.
- Quick Turnaround: Prep in 15 minutes and cook in 30—total 45 minutes, perfect for a busy weeknight.
Alright, let’s break down exactly what goes into this masterpiece…
Inside the Ingredient List
The Flavor Base
The single can of sweetened condensed milk is the heart of this dessert. It provides a rich, creamy sweetness that forms the glue holding everything together. Skipping it would leave you with a dry, unsatisfying coconut mixture. If you’re looking for a lower‑sugar option, consider a reduced‑sugar condensed milk, but be prepared for a slightly less luscious texture.
The Texture Crew
Two cups of unsweetened grated coconut are the star performers. They give the dessert its chewiness and a natural, nutty flavor that’s unmistakably tropical. The unsalted butter, in a modest two tablespoons, enriches the mixture, adding a silky mouthfeel that balances the coconut’s fibrous texture. If you’re allergic to dairy, coconut oil can replace the butter, though the flavor profile will shift slightly toward a more pronounced coconut taste.
The Unexpected Star
Twenty whole cloves aren’t just for decoration—they add a warm, aromatic undertone that lingers on the palate. When you bite into a Beijinho, the subtle clove note surprises and delights, elevating the simple sweetness to something truly special. If cloves are hard to find, a pinch of ground cinnamon can mimic the warmth, though the flavor will be more subtle.
The Final Flourish
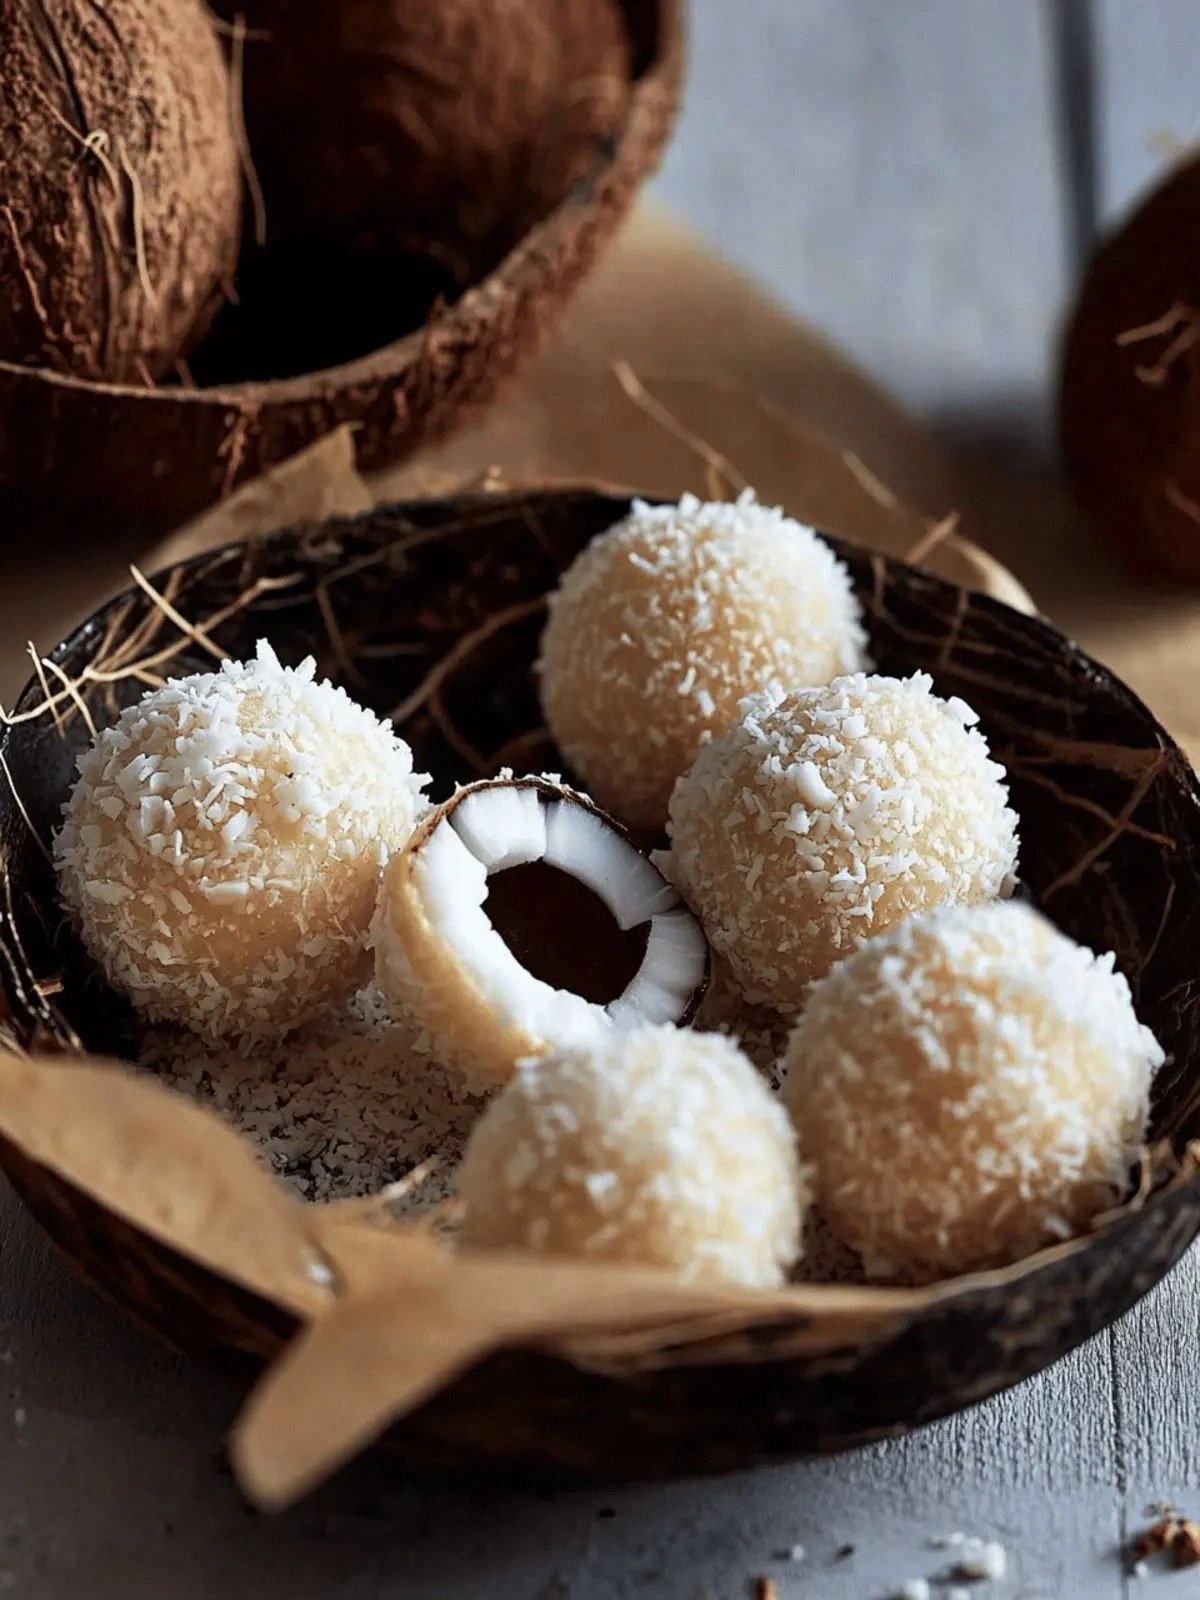
One cup of grated coconut for rolling ensures each ball has a glossy, golden coat. This coating not only looks impressive but also adds an extra layer of texture and flavor. Rolling in toasted coconut instead of raw adds a nutty crunch that many find irresistible. The final touch of a light dusting of powdered sugar can give an extra sweet finish, but it’s entirely optional.
Everything’s prepped? Good. Let’s get into the real action…
The Method — Step by Step
- Gather Your Gear: Grab a medium saucepan, a wooden spoon, a measuring cup, and a small bowl for rolling. This is the only time you’ll need a whisk—after that, you’re in the rolling zone. Make sure everything is clean; a sticky pan will ruin the texture.
- Melt the Butter: Place the two tablespoons of unsalted butter in the saucepan over medium heat. Let it melt completely, watching for the gentle sizzle that signals readiness. This step is crucial for the final gloss.
- Add Condensed Milk: Pour the entire can of sweetened condensed milk into the pan. Stir continuously; the mixture should start to thicken after about 2–3 minutes. The key is to avoid burning—keep the heat moderate.
- Introduce the Coconut: Fold in the two cups of unsweetened grated coconut. Mix until the coconut is evenly coated, then let the mixture cook for another 5 minutes. You’ll notice it pulling away from the sides of the pan—a sign it’s ready.
- Flavor Boost: Drop in the twenty whole cloves. Stir them in, ensuring they’re distributed evenly. The cloves will release their aroma slowly, infusing the mixture with warmth.
- Cooling Phase: Remove the saucepan from heat. Let the mixture cool for about 5 minutes—this prevents the balls from sticking together when you roll them. The mixture should be warm enough to handle but not hot.
- Shape the Balls: Using a teaspoon, scoop a portion of the mixture and roll it between your palms into a ball. Repeat until you’ve used all the mixture. If the mixture is too sticky, wet your hands with a little water to prevent sticking.
- Coat in Coconut: Roll each ball in the one cup of grated coconut for rolling. This gives the Beijinho a glossy, golden finish and a subtle crunch. Shake off any excess coconut before placing them on a parchment‑lined tray.
- Chill: Place the tray in the refrigerator for at least 30 minutes. The cooling process firms up the texture, making each bite a perfect bite‑size experience.
- Serve: Once chilled, transfer the balls to a serving dish. They’re ready to be enjoyed immediately or stored for later.
That’s it— you did it. But hold on, I've got a few more tricks that'll take this to another level…
Insider Tricks for Flawless Results
The Temperature Rule Nobody Follows
Cooking the coconut mixture at a steady medium heat ensures even caramelization. If the heat is too high, the sugar will burn, giving a bitter aftertaste. I’ve seen many friends skip this step and end up with a burnt flavor; trust me, it’s worth the patience.
Why Your Nose Knows Best
Before you start rolling, smell the mixture. A sweet, buttery aroma indicates the right consistency. If it smells more like raw coconut, give it a few more minutes to thicken. Your nose is the ultimate quality control.
The 5-Minute Rest That Changes Everything
Letting the mixture rest on the stove after removing it from heat allows the flavors to meld. This brief pause prevents the balls from being too soft when you first roll them. I’ve found that a short rest makes the texture more cohesive.
Rolling Technique for Perfection
Use a small cookie scoop or a teaspoon to portion the mixture. Rolling each portion between your palms ensures uniform size. If the balls are uneven, they’ll melt at different rates, which can be a bit disappointing.
Storing Like a Pro
Keep the Beijinhos in an airtight container in the fridge. The coconut’s natural oils can cause them to stick together, so a parchment sheet between layers helps maintain their shape. If you’re planning ahead, freeze them for up to a month.
Creative Twists and Variations
This recipe is a playground. Here are some of my favorite ways to switch things up:
Rum‑Infused Beijinho
Add a tablespoon of dark rum to the coconut mixture. The alcohol adds depth and a warm finish, making it perfect for holiday gatherings.
Chocolate‑Covered Delight
Dip the rolled balls in melted dark chocolate and let them set. The chocolate’s bitterness balances the sweetness, creating a sophisticated treat.
Spiced Coconut
Replace the cloves with a pinch of ground cinnamon and nutmeg. This variation gives the dessert a warm, comforting spice profile.
Nutty Crunch
Add chopped toasted almonds or pistachios to the mixture before rolling. The nuts introduce a crunchy texture and a nutty flavor that pairs beautifully with coconut.
Fresh Berry Topping
Top each ball with a dollop of fresh whipped cream and a few blueberries. The tartness of the berries cuts through the sweetness, adding a refreshing contrast.
Vegan Version
Use coconut milk condensed instead of dairy milk and replace butter with coconut oil. The result is a dairy‑free treat that still delivers on flavor.
Storing and Bringing It Back to Life
Fridge Storage
Place the Beijinhos in an airtight container and refrigerate for up to a week. The cold temperature preserves the texture and keeps the flavors fresh. For best results, let them sit at room temperature for 10 minutes before serving.
Freezer Friendly
Wrap each ball individually in parchment paper before freezing. This prevents them from sticking together and makes it easy to grab a single dessert. They’re good for up to three months if kept in a freezer‑safe container.
Best Reheating Method
To revive frozen Beijinhos, place them in the fridge overnight. If you’re short on time, microwave on low power for 10–15 seconds. Add a tiny splash of water before reheating to create steam, restoring the soft, melt‑in‑your‑mouth texture.