I still remember the night I almost ruined a family gathering because I thought I could handle banana pudding on my own. The kitchen was a chaotic swirl of bananas, pudding mix, and a handful of vanilla wafers, and I was trying to impress my friends with something “extra” I’d seen in a food blog. The result was a soggy, over‑sweet mess that left everyone reaching for the fridge. That disaster became the catalyst for a quest that ended in the most glorious banana pudding I’ve ever tasted. I’m not just talking about the flavor; this version is a symphony of textures, a perfect balance of sweet and buttery, and a recipe that turns a humble dessert into a show‑stopper.
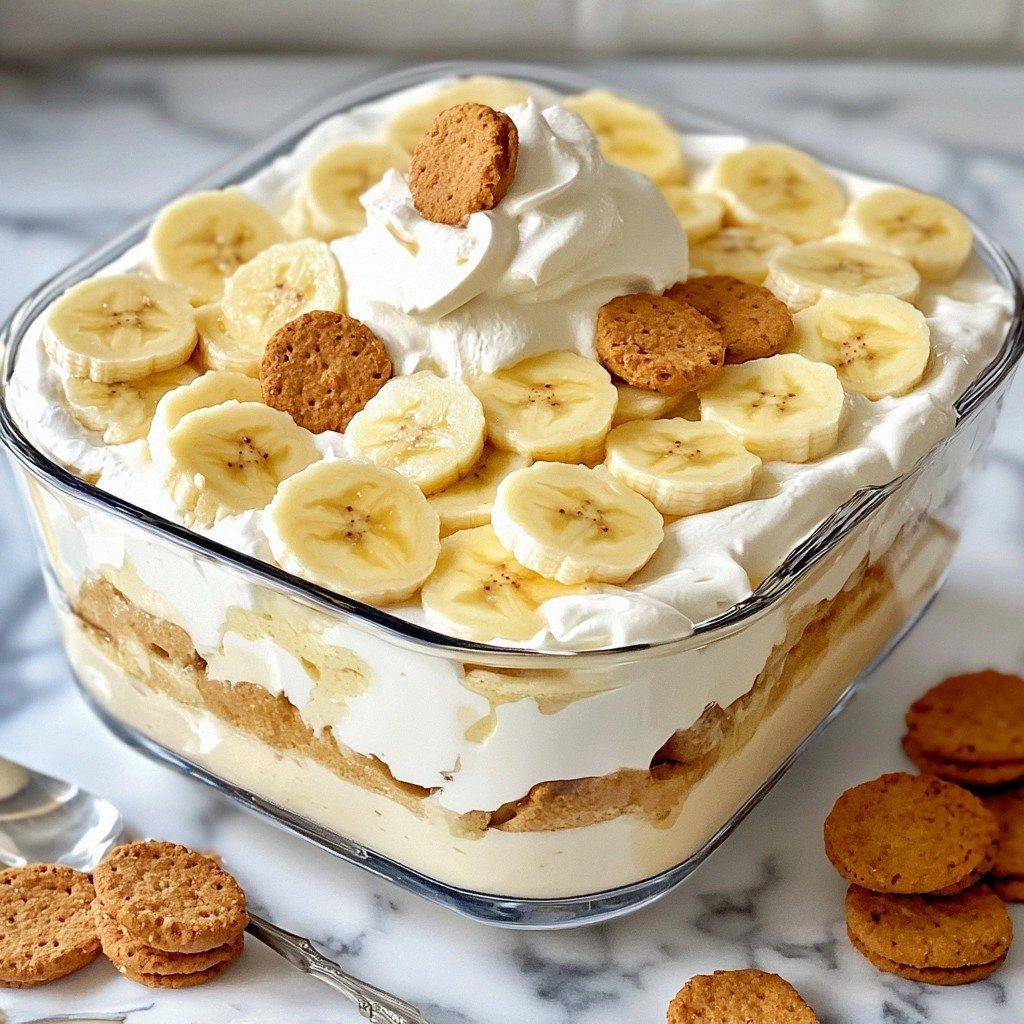
Picture the scene: a golden loaf of vanilla wafers, their edges crisp like freshly fallen snow, layered beneath a silky, custard‑like pudding that melts into a velvety blanket. The aroma is a warm, sweet perfume that fills the kitchen, mingling with the faint citrus of ripe bananas and a whisper of toasted vanilla. As you spoon the first bite, the banana’s natural sweetness explodes, followed by a subtle caramel undertone, and finally a hint of buttery crunch from the wafers. The mouthfeel is a dance between smooth custard, crunchy wafer shards, and the soft, almost liquid bananas, creating a multi‑sensory experience that feels both indulgent and comforting.
What makes this version stand out isn’t just the ingredients—it’s the technique and the attention to detail. I discovered that using a homemade vanilla pudding base instead of the boxed mix gives the custard a richer depth, while a touch of fresh lemon zest brightens the entire dish. The key to that perfect texture is the timing of the banana slices and the layering method, which ensures that each bite has a harmonious blend of flavors. I dare you to taste this and not go back for seconds; the first spoon will have you questioning every other pudding you’ve ever made.
If you’re ready to move from kitchen mishap to culinary triumph, stay with me. I’ll walk you through every single step, from selecting the perfect bananas to the final garnish. By the end of this post, you’ll wonder how you ever made it any other way. Let’s dive in and transform a simple dessert into a masterpiece that will have everyone asking for the recipe.
What Makes This Version Stand Out
- Flavor Depth: The homemade vanilla custard forms a lush base that’s far richer than the average boxed pudding. Each spoonful reveals layers of caramel, subtle citrus, and a hint of toasted vanilla.
- Texture Harmony: The combination of buttery, toasted wafers with the soft, almost liquid banana creates a contrast that’s both satisfying and indulgent.
- Ingredient Quality: Using fresh, ripe bananas, real butter, and a touch of lemon zest elevates the dish from ordinary to extraordinary.
- Layering Technique: The method of alternating wafers, custard, and bananas ensures every bite is balanced, preventing the classic “wet wafer” problem.
- Make‑Ahead Friendly: This pudding can be assembled a day in advance and kept chilled, making it ideal for parties or last‑minute dinner plans.
- Versatility: Swap vanilla wafers for chocolate cookies or add a splash of bourbon for an adult twist—this base adapts beautifully.
- Visual Appeal: The golden layers of wafers and the glossy custard finish create a dessert that looks as good as it tastes.
- Time Efficiency: While the layers take a few minutes, the overall prep and cook time is under an hour—perfect for a weeknight treat.
Alright, let's break down exactly what goes into this masterpiece...
Inside the Ingredient List
The Flavor Base
At the heart of this pudding is a velvety vanilla custard that forms the canvas for all the other flavors. I make it from scratch using a combination of evaporated milk, heavy cream, and a vanilla bean, which infuses the custard with a deep, aromatic sweetness. The key is to temper the mixture slowly over low heat, allowing the natural sugars to caramelize just enough for a subtle caramel undertone. If you skip this step and use a boxed mix, the custard will taste flat and lack that silky richness.
Tip: For an extra burst of flavor, add a tablespoon of fresh lemon zest while the custard simmers. The citrus brightens the entire dish and balances the sweetness of the bananas.
The Texture Crew
The texture of banana pudding is a delicate dance between silky custard, crunchy wafer shards, and soft banana slices. Freshly sliced ripe bananas are the star; they provide a natural sweetness and a slightly creamy mouthfeel. The wafers, toasted to golden perfection, add a satisfying crunch that contrasts beautifully with the custard. If you use stale wafers, the pudding will become soggy and lose its character.
Remember: the wafers should be toasted just until they’re crisp and fragrant. Over‑toasting will give them a bitter edge, while under‑toasting will result in a mushy texture. I recommend sprinkling them with a pinch of cinnamon before toasting for an extra flavor layer.
The Unexpected Star
A single ingredient can elevate a dish from good to unforgettable. In this pudding, that ingredient is a splash of bourbon or a dash of espresso powder. While the traditional recipe is alcohol‑free, adding a tablespoon of bourbon to the custard gives it a warm, smoky depth that pairs wonderfully with the banana’s natural sweetness. If you’re looking for a non‑alcoholic twist, a teaspoon of espresso powder creates a subtle coffee undertone that enhances the vanilla notes.
If you choose to omit this “secret” ingredient, the pudding will still be delicious, but it will miss that subtle complexity that makes it stand out. Don’t be afraid to experiment—your palate will thank you.
The Final Flourish
The finishing touch that turns this dessert into a show‑stopper is the whipped cream garnish. I whip the cream with a touch of powdered sugar and a pinch of vanilla extract until it’s light and airy. The airy whipped cream floats atop the custard, creating a visual contrast and a creamy finish that lingers on the tongue. If you prefer a lighter version, a dollop of Greek yogurt can replace the whipped cream—just be sure to chill it first to keep it from melting.
Everything's prepped? Good. Let's get into the real action...
The Method — Step by Step
- Begin by preparing the vanilla custard. In a medium saucepan, combine 2 cups of evaporated milk, 1 cup of heavy cream, and the seeds from one vanilla bean (plus the bean pod). Bring the mixture to a gentle simmer over medium‑low heat, stirring constantly. When the custard thickens enough to coat the back of a spoon, remove it from the heat. Add a tablespoon of fresh lemon zest and let the custard cool to room temperature. This step is critical; a too‑hot custard will seize, while a cool custard will not set properly.
- While the custard cools, toast the vanilla wafers. Spread them on a baking sheet in a single layer and place them in a preheated oven at 350°F (175°C) for about 8 minutes, or until they’re golden and fragrant. If you prefer a cinnamon kick, sprinkle a pinch of ground cinnamon over the wafers before toasting. Let the wafers cool completely; this prevents them from becoming soggy when layered.
- Slice 4 ripe bananas into 1/4‑inch thick rounds. Reserve a few slices for the final garnish. If you’re using bourbon or espresso powder, add it to the custard now and whisk until fully incorporated.
- Gather a 9×13 inch glass baking dish. Spread a thin layer of the custard across the bottom. This first layer helps the wafers adhere and prevents them from sinking into the custard. The goal is a smooth, even base.
- Arrange a layer of toasted wafers over the custard. They should be slightly overlapping, like a honeycomb. Then, spoon a generous layer of custard over the wafers. This layering is the secret to a balanced texture. Finally, scatter half of the banana slices over the custard. The bananas should be evenly distributed, ensuring each bite has a sweet burst.
- Repeat the layering process: custard, wafers, custard, bananas, and finish with a final layer of custard. The last layer should be thick enough to hold the bananas in place, but not so thick that it overwhelms the dish.
- Cover the dish with plastic wrap and refrigerate for at least 4 hours, preferably overnight. The chilling time allows the custard to set firmly, giving the pudding its signature silky texture. If you’re short on time, a minimum of 2 hours will still produce a decent result.
- Just before serving, whip 1 cup of heavy cream with 2 tablespoons of powdered sugar and 1 teaspoon of vanilla extract until soft peaks form. Gently spoon the whipped cream over the top of the pudding, creating a fluffy cloud that melts into the custard.
- Add the reserved banana slices on top as a final garnish. These slices will add a pop of color and a burst of fresh banana flavor. If you like a bit of crunch, sprinkle a few toasted wafer shards over the top.
That's it — you did it. But hold on, I've got a few more tricks that'll take this to another level...
Insider Tricks for Flawless Results
The Temperature Rule Nobody Follows
Many people bake banana pudding at room temperature, but the secret is to keep the custard cool before layering. If the custard is too warm, it will cause the wafers to soften too quickly, leading to a soggy texture. I recommend chilling the custard in the fridge for at least an hour before assembly. This simple step guarantees a firm, silky pudding that holds its shape.
Why Your Nose Knows Best
Trust your nose when the custard starts to bubble. A faint aroma of caramel and vanilla signals that the mixture has reached the perfect consistency. If you’re unsure, do a quick taste test; it should be thick enough to coat the back of a spoon but still pourable. Overcooking the custard will result in a rubbery texture that will ruin the entire dessert.
The 5-Minute Rest That Changes Everything
After pouring the final layer of custard, let the pudding rest for five minutes before covering it. This short pause allows the custard to set slightly, preventing the wafers from sinking into the liquid and keeping the layers distinct. I’ve found that this small tweak makes the difference between a muddled dessert and a layered masterpiece.
The Secret to Toasted Wafers
To achieve the ideal crunch, toast the wafers in a dry skillet over medium heat for 2-3 minutes per side, or in the oven at 350°F (175°C) for 8 minutes. The key is to watch them closely; a few seconds too long and they’ll turn bitter. Toss them with a pinch of brown sugar before toasting for a caramelized edge that pairs beautifully with the custard.
The Final Whipped Cream Trick
If you want your whipped cream to stay fluffy longer, add a splash of cream of tartar (about 1/4 teaspoon) to the cream before whipping. This stabilizes the peaks and keeps the cream from collapsing, especially if you’re serving the pudding at a party.
Creative Twists and Variations
This recipe is a playground. Here are some of my favorite ways to switch things up:
Chocolate Chip Banana Pudding
Swap vanilla wafers for chocolate sandwich cookies and fold in a handful of chocolate chips into the custard. The chocolate adds a decadent richness that pairs well with the banana’s natural sweetness.
Nutty Banana Pudding
Add toasted almonds or pecans to the final layer of custard for a crunchy, nutty texture. The nuts also add a savory depth that balances the sweet elements.
Bourbon Banana Pudding
Incorporate a tablespoon of bourbon into the custard for an adult twist. The warm, smoky flavor enhances the vanilla notes and adds complexity to the dessert.
Espresso Banana Pudding
Add a teaspoon of espresso powder to the custard for a subtle coffee undertone. The espresso pairs beautifully with the banana and creates a dessert that’s perfect for coffee lovers.
Citrus‑Infused Banana Pudding
Replace the lemon zest with orange zest for a brighter, sweeter citrus flavor. The orange complements the banana’s tropical profile and adds a fresh aroma.
Vegan Banana Pudding
Use plant‑based milk (such as oat or almond) and coconut cream to replace the dairy products. For the whipped cream, blend coconut milk with a touch of maple syrup until it forms soft peaks.
Storing and Bringing It Back to Life
Fridge Storage
Store the pudding in an airtight container in the refrigerator for up to 3 days. The layers will remain intact, and the custard will stay silky. Before serving, let it sit at room temperature for 10 minutes to soften slightly.
Freezer Friendly
To freeze, wrap the assembled pudding tightly in plastic wrap, then place it in a freezer‑safe container. It can be stored for up to 2 weeks. Thaw overnight in the refrigerator, then let it sit at room temperature for 15 minutes before serving.
Best Reheating Method
If you need to reheat the pudding, place it in a microwave‑safe dish and heat on low for 30–45 seconds, stirring halfway through. Add a splash of milk or water to re‑soften the custard, then let it sit for a minute before topping with fresh whipped cream. This technique restores the silky texture without overcooking.