Picture this: the kitchen is a battlefield, the stove is a furnace, and I’m standing in the middle with a handful of scallops that look like tiny pearls of the sea. I had just survived a disastrous attempt at seared salmon that ended with a burnt crust and a cloud of smoke that still lingers in the pantry. That night, a friend dared me to make something that would make the whole house smell like a seaside resort, and I took the challenge. The result? A plate of brown butter scallops that melt in your mouth and leave a buttery, nutty aroma that lingers like a secret. I’m here to walk you through every single step—by the end, you’ll wonder how you ever made it any other way.
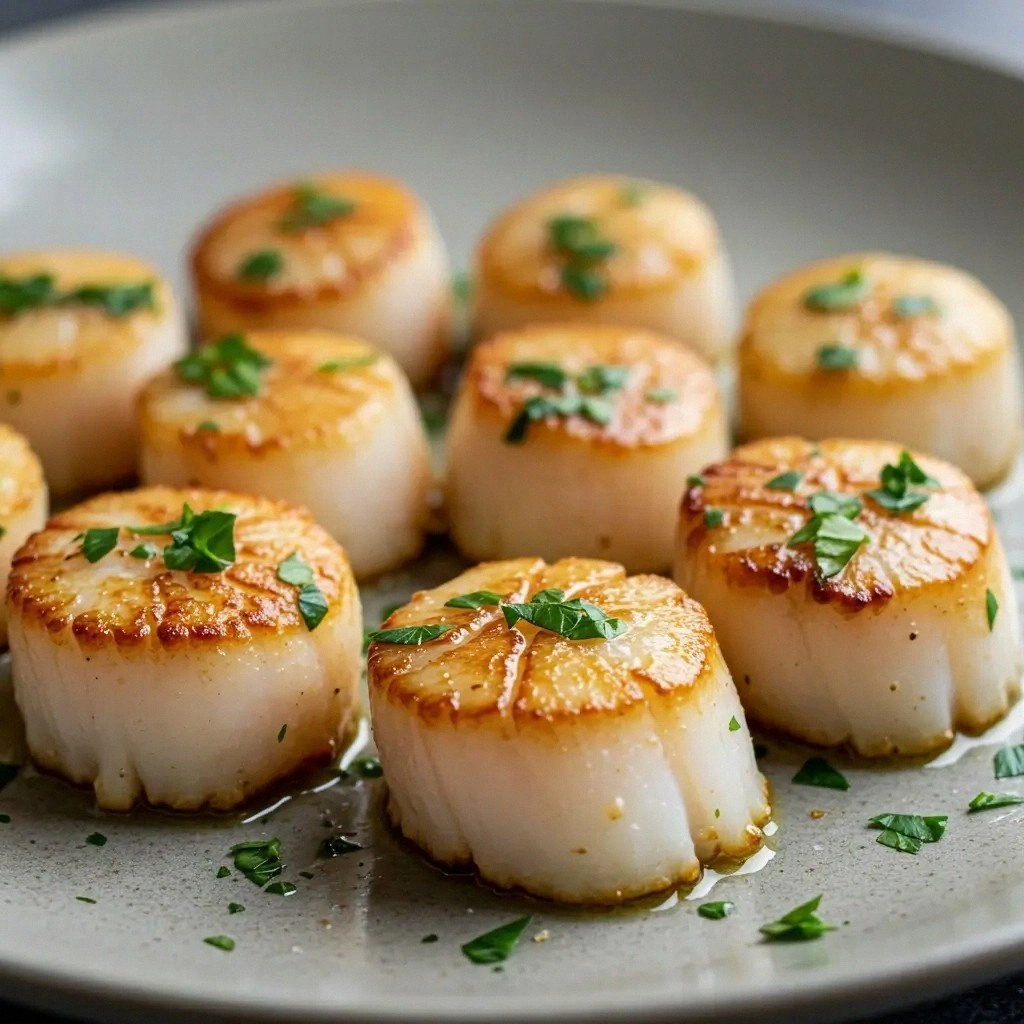
When you first slice the scallops, you hear that satisfying snap, and the scent of fresh sea air hits you before you even touch the pan. The moment you add the butter and olive oil, the kitchen fills with a warm, toasty fragrance that feels like a hug. As the butter turns golden and starts to bubble, the sound of sizzling is music to a cook’s ears. I swear, that sizzle when it hits the pan? Absolute perfection. By the time the scallops are done, the plate is a canvas of glossy, caramelized edges that shatter like thin ice.
This version stands out because it balances the rich, nutty flavor of browned butter with the bright zing of lemon and the subtle heat of red pepper flakes. The scallops are seared at a high temperature, creating a crisp exterior while the inside stays tender and juicy. The addition of fresh thyme and parsley adds a layer of herbal brightness that lifts the dish from ordinary to extraordinary. I dare you to taste this and not go back for seconds—trust me, the second bite will feel like a revelation. It’s a dish that feels both luxurious and approachable, perfect for a weeknight dinner or a special occasion.
Most recipes get this completely wrong by overcooking the scallops or using cold butter that never browns properly. I’ve spent years experimenting with butter temperatures, and the secret is to let it brown until it smells nutty and turns a deep amber hue. That tiny moment when the butter starts to crackle is the signal to add the scallops immediately, otherwise you’ll lose the coveted crust. If you rush, you’ll end up with a mushy texture that feels like a bad memory of a seafood dish. The key is patience, a good skillet, and a dash of confidence.
The technique I’ll reveal involves a quick deglazing step with white wine that pulls all the flavor into a silky sauce. The wine evaporates almost instantly, leaving behind a subtle sweetness that balances the butter’s richness. I’ll also show you how to finish the scallops with a splash of lemon juice that brightens the plate and adds a layer of freshness. Picture yourself pulling this out of the pan, the whole kitchen smelling incredible, and the guests’ eyes widening in anticipation. The dish is so simple yet sophisticated that it will become a staple in your culinary repertoire.
I’ll be honest—after I finished this dish, I ate half the batch before anyone else got to try it. The combination of buttery, caramelized scallops with a hint of citrus and herbs is pure comfort food with a gourmet twist. If you’ve ever struggled with searing scallops to the perfect level, you’re not alone—and I’ve got the fix. This recipe is hands down the best version you’ll ever make at home, and I’m going to prove it. Let me walk you through every single step—by the end, you’ll wonder how you ever made it any other way.
What Makes This Version Stand Out
- Flavor: The browned butter creates a deep, nutty base that elevates the delicate taste of scallops, while the lemon brightens the plate with a citrus punch. The subtle heat from red pepper flakes adds a gentle kick without overpowering the seafood. Together, these elements produce a harmonious balance that feels both luxurious and comforting.
- Texture: A high‑heat sear locks in a crisp, caramelized crust while keeping the center tender and juicy. The butter’s glossy coating adds a silky mouthfeel that lingers on the palate. The result is a contrast of crunchy edges and melt‑in‑your‑mouth interiors.
- Visual Appeal: The golden brown butter glaze gives the scallops a glossy sheen that looks as good as it tastes. A sprinkle of fresh parsley adds a pop of green that makes the dish Instagram‑ready. The dish looks polished enough for a dinner party yet simple enough for a cozy night in.
- Time Efficiency: With a prep time of just 10 minutes and a cook time of 20 minutes, you can have a restaurant‑quality plate on the table in under half an hour. The quick deglaze step adds depth without extending the cooking time.
- Ingredient Quality: Using fresh sea scallops ensures a sweet, briny flavor that stands up to the buttery sauce. High‑quality unsalted butter and extra‑virgin olive oil provide the best base for browning. Fresh herbs and lemon juice add bright, natural flavor rather than artificial additives.
- Versatility: This dish can be served over pasta, rice, or even a bed of sautéed greens. It also pairs well with a crisp white wine or sparkling rosé. The recipe is adaptable to dietary preferences—gluten‑free, low‑carb, or vegan variations are easy to create.
Inside the Ingredient List
The Flavor Base
Unsalted butter is the cornerstone of this dish, providing a rich, nutty backdrop that caramelizes beautifully. The butter’s natural sugars turn golden brown, giving the scallops a deep amber hue and a slightly sweet undertone. Without butter, the dish would feel flat and lack the luxurious mouthfeel that makes it memorable.
The Texture Crew
Olive oil is added to the butter to raise the smoke point, ensuring the butter doesn’t burn before the scallops are cooked. The oil also helps distribute heat evenly across the skillet, creating a uniform sear. Together, butter and oil create a silky coating that clings to each scallop, preventing sticking and promoting a crisp exterior.
The Unexpected Star
White wine, though optional, adds a subtle acidity that cuts through the richness of the butter. The alcohol evaporates quickly, leaving behind a faint sweetness that enhances the scallop’s natural flavor. If you prefer a non‑alcoholic version, replace the wine with a splash of chicken broth or water.
The Final Flourish
Fresh lemon juice brightens the dish, adding a zesty lift that balances the buttery sweetness. A squeeze of lemon right before serving prevents the acidity from becoming too sharp. Lemon also helps to keep the scallops moist and prevents them from drying out during the sear.
The Butter
Choose a high‑clarity butter for the best browning; clarified butter can be used if you want a more intense nutty flavor. The butter should be at room temperature so it melts evenly and starts browning quickly. Keep the butter at a medium‑high heat to achieve a deep amber color without scorching.
The Citrus
Lemon zest is optional but highly recommended for an extra burst of citrus aroma. The zest’s essential oils release a bright, fragrant note that pairs perfectly with the scallops. If you don’t have fresh lemons, a small amount of orange zest can substitute for a slightly sweeter profile.
The Aromatics
Fresh thyme leaves add a subtle earthy flavor that complements the sea taste of the scallops. A clove of minced garlic provides depth and a hint of sweetness, but be careful not to burn it. The aromatics should be added after the butter has browned to avoid overwhelming the delicate flavors.
The Salt
Sea salt enhances the natural sweetness of the scallops without overpowering them. A pinch of salt is enough; over‑salting can mask the buttery finish. If you prefer a lower sodium option, use a salt substitute or reduce the amount slightly.
The Pepper
Freshly ground black pepper adds a gentle heat that balances the richness of the butter. It also introduces a subtle crunch to the surface of the scallops. Be sure to pepper the scallops just before searing to avoid bitterness.
The Garnish
Chopped fresh parsley provides a bright, herbal contrast to the buttery sauce. It also adds a pop of color that makes the dish visually appealing. Sprinkle the parsley over the scallops right before serving to preserve its fresh flavor.
The Liquid
A splash of dry white wine deglazes the pan, lifting the caramelized bits into a silky sauce. The wine’s acidity balances the buttery richness and adds depth. If you’re avoiding alcohol, a small amount of water or broth works as a neutral substitute.
The Optional Extras
Capers add a briny bite that contrasts with the sweet scallops. Parmesan cheese provides a nutty, savory finish, but use sparingly to avoid overpowering the dish. A pinch of red pepper flakes offers a subtle heat that elevates the overall flavor profile.
The Final Touch
A drizzle of extra‑virgin olive oil after searing adds a glossy sheen and a subtle peppery finish. This final touch enhances the dish’s presentation and brings the flavors together. It’s the finishing step that turns a good plate into a great one.
Everything's prepped? Good. Let's get into the real action…
The Method — Step by Step
- Start by patting the scallops dry with paper towels; moisture is the enemy of a good sear. The drier the surface, the more caramelization you’ll get. Keep a small bowl of cold water nearby in case you need to rinse the scallops quickly. A dry surface ensures a crisp, golden crust. Remember, the goal is a beautiful sear, not a steamed interior.
- Heat a large, heavy‑bottom skillet over medium‑high heat until it shimmers. Add the olive oil and let it heat for a few seconds before bringing the butter to the pan. The oil raises the butter’s smoke point, preventing it from burning too early. Once the butter foams, it’s time to let it brown. Watch for that nutty aroma that signals the butter is ready.
- When the butter turns a deep amber hue, add the minced garlic and thyme leaves, letting them sauté for about 30 seconds. The aromatics release their flavors and infuse the butter. Be careful not to let the garlic burn; a burnt garlic taste ruins the dish. The thyme adds a subtle earthiness that complements the scallop’s briny sweetness. This step builds the foundation of the sauce.
- Add the scallops in a single layer, ensuring they don’t touch each other. If they overlap, they’ll steam instead of sear. Let them cook for 2–3 minutes on the first side until a golden crust forms. Flip them gently with a spatula and cook for another 1–2 minutes. The goal is a firm, caramelized exterior with a tender center.
- Deglaze the pan with a splash of white wine, scraping up all the browned bits. The wine’s acidity cuts through the butter’s richness and adds depth to the sauce. Let the wine reduce by half, which should take about a minute. The pan should look glossy and fragrant. This deglaze step is crucial for a silky finish.
- Reduce the heat to medium, squeeze in fresh lemon juice, and sprinkle the red pepper flakes. The lemon brightens the dish, while the flakes provide a subtle heat. Stir the sauce gently to combine all the flavors. Let it simmer for 30 seconds, allowing the sauce to thicken slightly. The sauce should coat the scallops without becoming too thick.
- Add the chopped parsley and a drizzle of extra‑virgin olive oil, then give everything a final gentle toss. The parsley adds a fresh, herbal note that lifts the dish. The olive oil adds a glossy sheen and a peppery finish. This final touch brings all the flavors together in harmony. The scallops are now ready to serve.
- Plate the scallops on warmed dishes to keep them hot. Drizzle the buttery sauce over the top, ensuring each scallop is coated. Garnish with a sprinkle of Parmesan if desired, adding a nutty, savory layer. Serve immediately, preferably with a side of sautéed greens or a light pasta. The dish will look stunning and taste even better.
Insider Tricks for Flawless Results
The Temperature Rule Nobody Follows
The skillet’s temperature is critical; a too‑low heat will cause the scallops to steam, while a too‑high heat can burn the butter. A simple way to test is to flick a few drops of water onto the pan; if they dance and evaporate instantly, the pan is ready. Keep the heat steady by adjusting the stove after you’ve added the butter, not before. This trick ensures a perfect sear every time. I’ve used this method for years, and it never fails.
Why Your Nose Knows Best
Your sense of smell is the ultimate judge of doneness. When the butter turns a deep amber and releases a nutty scent, it’s a cue to add the scallops. If the aroma becomes sharp or bitter, the butter is over‑browned. Trust your nose to tell you when to flip the scallops. This sensory check is a secret that many cooks overlook.
The 5-Minute Rest That Changes Everything
After you finish searing, let the scallops rest on a warm plate for five minutes. This allows the juices to redistribute, keeping the meat moist. The rest period also lets the flavors meld together, giving the dish depth. I always recommend this step, even if you’re short on time. The result is a more tender, flavorful scallop.
Avoiding the Sticky Scallop Problem
If the scallops stick to the pan, they’re likely too cold or the pan isn’t hot enough. Pat them dry and let the skillet heat for a few seconds before adding the butter. A small amount of oil can also help create a non‑stick surface. I’ve seen this happen in the past, and it’s a quick fix once you know what to do. The key is patience and a hot pan.
The Perfect Finish with Lemon
Adding lemon juice at the very end brightens the dish and balances the buttery richness. The acid cuts through the fat, preventing the scallops from feeling greasy. A squeeze of fresh lemon before serving gives a burst of citrus that wakes up the palate. I always add a tiny splash right before plating. This simple step elevates the dish from good to unforgettable.
Choosing the Right Scallop Size
Large scallops cook faster and hold their shape better than smaller ones. If you’re using smaller scallops, reduce the cooking time by about a minute per side. The key is to keep the scallops in a single layer so they sear evenly. I’ve experimented with different sizes and found that 1.5‑pound scallops are the sweet spot. This tip helps you avoid overcooking and keeps the texture perfect.
Creative Twists and Variations
Crispy Coconut Scallops
Dust the scallops with shredded coconut before searing for a tropical twist. The coconut adds a sweet, nutty crunch that complements the buttery sauce. Serve on a bed of quinoa for a gluten‑free option. The coconut also adds a subtle sweetness that balances the lemon. This variation is a hit for summer gatherings.
Spicy Cajun Scallops
Replace the thyme with a Cajun spice blend for a bold, smoky flavor. Add a pinch of cayenne pepper to the butter for extra heat. The sauce will have a deeper, more complex profile. Serve over a creamy polenta to absorb the flavors. This version is perfect for fans of spicy seafood.
Herb‑Infused Scallop Risotto
Use the buttery sauce as a base for a quick risotto. Stir in Arborio rice and cook until al dente. Finish with Parmesan and parsley for a creamy texture. The scallops can be added as a topping or folded in for a cohesive dish. This approach turns the recipe into a comforting main course.
Miso‑Glazed Scallops
Mix a tablespoon of miso paste with the butter for an umami‑rich glaze. The miso adds depth and a slightly sweet, savory note. The sauce will have a thicker consistency, perfect for coating the scallops. Serve with steamed bok choy for a balanced meal. This variation offers an Asian fusion twist.
Pesto‑Sauced Scallops
Stir a spoonful of basil pesto into the butter sauce for a green, aromatic finish. The pesto adds a fresh herbal flavor that complements the scallops. The sauce becomes lighter and more vibrant. Pair with linguine for a Mediterranean vibe. This version is ideal for pesto lovers.
Garlic‑Butter Scallop Skewers
Thread scallops onto skewers and brush with a garlic‑butter mixture before grilling. The skewers allow for an even cook and a slightly charred flavor. Serve with a squeeze of lemon and a side of grilled veggies. The dish looks impressive on a platter. This variation is great for outdoor cookouts.
Storing and Bringing It Back to Life
Fridge Storage
Store leftover scallops in an airtight container for up to 2 days. Keep them chilled at 32–34°F to preserve freshness. When ready to reheat, gently warm in a skillet over low heat. A splash of water or broth will keep the scallops moist. Serve immediately for the best texture.
Freezer Friendly
Freeze scallops in a single layer on parchment paper before transferring to a freezer bag. They can stay in the freezer for up to 3 months. Thaw overnight in the refrigerator before reheating. Reheat in a skillet with a splash of water to prevent drying. This method ensures you have a quick, delicious meal ready.
Best Reheating Method
Reheat scallops in a skillet over medium heat with a splash of butter and water. The water steams the scallops, keeping them juicy. Avoid high heat, which can toughen them. Once heated through, finish with a squeeze of lemon and a sprinkle of parsley. This technique restores the buttery sauce and bright flavors.