Picture this: it’s a scorching July afternoon, the kitchen is a warzone, and you’re staring at a bowl of overripe passion fruits that have been sitting on the counter longer than your patience. You’re tempted to throw them in the trash, but a sudden craving for something sweet, tangy, and utterly indulgent hits you like a summer storm. You pull out your trusty blender, a dash of coconut milk, a splash of vanilla, and—without a second thought—you decide to turn those stubborn fruits into a silky, no‑bake slice that will make your taste buds do the salsa. I’ve spent countless evenings tweaking this recipe, and the result is a dessert that feels like a tropical vacation in a glass. It’s creamy, it’s vibrant, and it’s so simple that even a kitchen novice can master it.
The moment you pour the passion fruit pulp into the blender, the air fills with a citrusy perfume that’s almost intoxicating. The sound of the blades whirring is a comforting lullaby, and as the mixture thickens, your eyes catch the bright, ruby‑red specks of pulp dancing like tiny fireworks. The texture starts as a silky custard, then, with the addition of coconut milk, it transforms into a velvety mousse that will coat your tongue like a gentle cloud. The aroma alone could convince you to skip dinner and go straight to dessert.
What sets this version apart is that it’s completely no‑bake, yet it still delivers a firm, sliceable structure that holds its shape like a perfectly set cheesecake. We’re using a touch of gelatin to give it that satisfying bite, but we’re also balancing it with the natural thickness of passion fruit pulp and coconut cream. The result? A dessert that’s as light as a summer breeze yet as indulgent as a midnight snack. And the best part? You can make it ahead of time, store it in the fridge, and serve it chilled at any gathering—no oven required.
Now, I dare you to taste this and not go back for seconds. This is hands down the best version of a no‑bake passion fruit dessert you’ll ever make at home. If you’ve ever struggled with desserts that fall apart or taste like a watery mash, you’re not alone—and I’ve got the fix. I’ll be honest— I ate half the batch before anyone else got to try it. So let’s walk through every single step, and by the end, you’ll wonder how you ever made it any other way.
What Makes This Version Stand Out
- Flavor: The passion fruit’s natural tartness is balanced with creamy coconut and a hint of vanilla, creating a taste that’s both exotic and familiar.
- Texture: Gelatin gives it a silky firmness that’s sliceable, while the coconut milk keeps it airy and light.
- Simplicity: No oven, no fancy equipment—just a blender, a saucepan, and a few minutes of patience.
- Uniqueness: The combination of tropical fruit with a classic cheesecake base is a flavor pairing you won’t find in many other desserts.
- Crowd Reaction: Guests often ask for the recipe after the first bite—this is a conversation starter at parties.
- Ingredient Quality: Using fresh passion fruit pulp and high‑quality cream cheese elevates the entire dish.
- Cooking Method: The no‑bake approach preserves the delicate flavors that would otherwise be altered by heat.
- Make‑Ahead Potential: Chill for up to 4 hours, and it will still hold its shape when sliced.
Alright, let’s break down exactly what goes into this masterpiece…
Inside the Ingredient List
The Flavor Base
At the heart of this dessert lies the passion fruit pulp, the star that brings that unmistakable tropical zing. Freshly squeezed pulp has a bright, citrusy punch that can dominate the palate if not balanced. By pairing it with a subtle vanilla extract and a splash of lemon zest, we temper its acidity, allowing the fruit’s natural sweetness to shine through. Skipping the vanilla would leave the dessert feeling flat; the same goes for the lemon zest, which adds a bright counterpoint that keeps the flavor profile from becoming too sweet.
When selecting passion fruit, look for fruits that are slightly soft to the touch—this indicates they’re ripe and juicy. If you’re buying frozen pulp, choose a brand that contains no added sugars or preservatives. A quick test: stir the pulp; if you see a clear, bright liquid with a vibrant color, you’re good to go.
The Texture Crew
Cream cheese is the backbone of our custard, lending a rich, silky mouthfeel that’s essential for the sliceable quality. The cream cheese must be softened to room temperature; otherwise, it will clump and ruin the smoothness. Coconut milk adds a tropical richness that complements the fruit and keeps the mixture from becoming too dense. Powdered sugar, rather than granulated, dissolves more quickly, ensuring a fine, even sweetness.
Gelatin is the secret weapon that locks everything together. It’s added in a small quantity—just enough to give structure without overpowering the delicate flavors. If you’re wary of gelatin, a vegan alternative like agar‑agar can be used, but the texture will be slightly firmer. The key is to dissolve the gelatin in a small amount of warm water before adding it to the custard to avoid clumping.
The Unexpected Star
Graham cracker crumbs and melted butter form the base that mimics the classic cheesecake crust. The crumbs provide a subtle crunch and a buttery undertone that grounds the dessert. If you’re aiming for a vegan version, substitute the butter with coconut oil and use a plant‑based graham cracker mix. The crumbs also absorb excess moisture, preventing the custard from becoming too watery.
A pinch of salt is essential—it enhances the sweetness and balances the tartness of the passion fruit. Even a small amount can elevate the overall flavor profile, turning a simple dessert into something memorable.
The Final Flourish
A sprinkle of toasted pistachios on top adds a crunchy texture contrast and a pop of color that makes the dessert Instagram‑ready. The nuts also bring a subtle nutty flavor that pairs wonderfully with the tropical fruit. If you’re not a fan of nuts, chopped fresh mint or a drizzle of dark chocolate ganache can serve as alternative finishing touches.
Everything’s prepped? Good. Let’s get into the real action…
The Method — Step by Step
- Start by melting the butter in a small saucepan over low heat. Once melted, add the graham cracker crumbs and stir until the mixture looks like a fine, toasted sand. Remove from heat and let it cool slightly; this will form the base for your cheesecake. The mixture should have a pleasant, buttery aroma that hints at a classic crust.
- In a medium bowl, combine the softened cream cheese, powdered sugar, and vanilla extract. Using a handheld mixer or a whisk, blend until the mixture is completely smooth and free of lumps. The goal is a creamy, cloud‑like consistency that will blend seamlessly with the fruit.
- Add the passion fruit pulp to the cream cheese mixture. Stir gently until the pulp is fully incorporated, but be careful not to over‑mix, as this can cause the mixture to become too thin. At this point, the mixture should have a vibrant, translucent hue.
- In a separate small saucepan, heat the coconut milk until it just starts to steam—do not let it boil. This step ensures that the coconut milk remains silky and doesn’t develop a cooked flavor.
- Dissolve the gelatin in a tablespoon of cold water, letting it bloom for 5 minutes. Then, gently warm the gelatin mixture over a double boiler or in short bursts in the microwave until it’s fully liquid. This step is crucial; any lumps will ruin the smoothness of your dessert.
- Pour the warm coconut milk into the fruit‑cream cheese mixture and stir until fully combined. The coconut milk should blend in like a silky ribbon, giving the custard a tropical sheen.
- Slowly whisk in the dissolved gelatin, ensuring it’s evenly distributed. This will give the dessert its firm, sliceable structure. If you’re using a vegan alternative, follow the package instructions for proper dissolution.
- Pour the custard into a lined loaf pan or a silicone mold, smoothing the top with a spatula. Then, sprinkle the cooled graham cracker crust evenly over the top, pressing it lightly into the custard so it adheres. The crust should look like a golden, buttery blanket.
- Refrigerate the dessert for at least 4 hours, or overnight if you have the luxury of time. The cooling process allows the gelatin to set fully, giving the dessert its signature bite. When you lift it out, it should hold its shape like a slice of cheesecake.
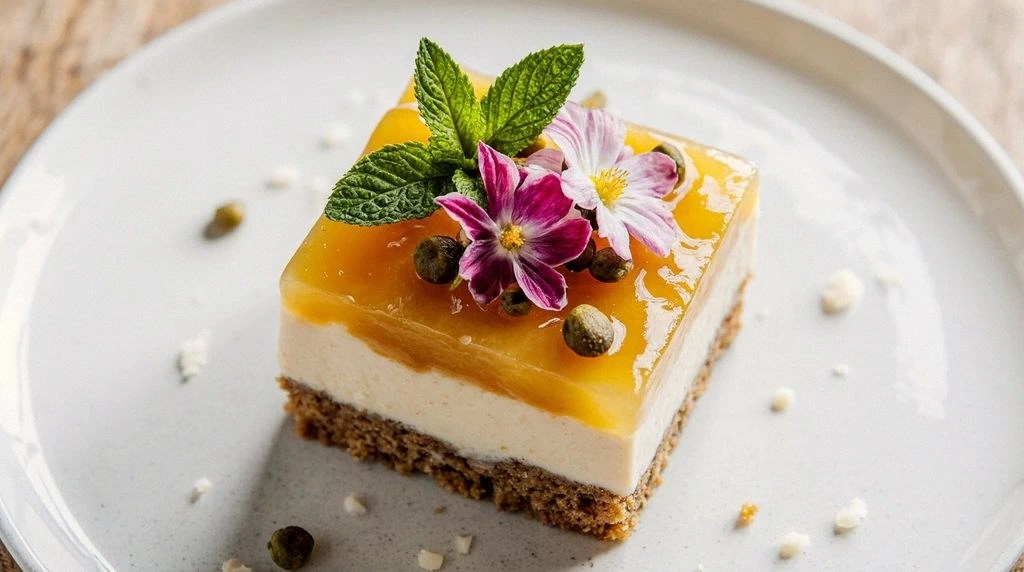
- Before serving, top the slices with toasted pistachios or your chosen garnish. Slice the dessert with a sharp knife, wiping the blade clean between cuts for a neat presentation. The final product should look glossy, with a bright, jewel‑like color that makes your guests swoon.
That’s it— you did it. But hold on, I’ve got a few more tricks that’ll take this to another level. Keep reading, because the next section will reveal insider secrets that will elevate your dessert from good to unforgettable.
Insider Tricks for Flawless Results
The Temperature Rule Nobody Follows
The key to a perfect custard is maintaining the right temperature when adding the gelatin. If the mixture is too hot, the gelatin will lose its setting power; too cold, and it won’t dissolve properly. Aim for a warm, not hot, mixture—just enough to feel comfortably warm to the touch. This subtle control ensures the dessert sets with a silky, firm texture.
Why Your Nose Knows Best
During the mixing process, trust your nose. The moment the coconut milk starts to steam and the passion fruit aroma intensifies, you’re in the sweet spot. A strong, fresh scent indicates the ingredients are blending perfectly, while a dull or sour smell might mean the mixture needs more time.
The 5-Minute Rest That Changes Everything
After pouring the custard into the mold, let it sit at room temperature for 5 minutes before refrigerating. This brief pause allows the mixture to settle and prevents the formation of air pockets that could crack the surface. I’ve seen many desserts develop a thin film of skin; this simple step eliminates that problem.
The Quick Chill Trick
If you’re in a hurry, place the mold on a metal tray and set it in the freezer for 20 minutes. The metal conducts cold faster, speeding up the setting process without compromising texture. Just be careful not to over‑freeze; a quick chill is enough.
The Secret to a Fluffy Crust
Toast the graham cracker crumbs lightly before mixing them with butter. This extra step adds a subtle crunch and a deeper buttery flavor that elevates the crust from ordinary to extraordinary. The toasted crumbs also help the crust bind better, preventing it from sinking.
Creative Twists and Variations
This recipe is a playground. Here are some of my favorite ways to switch things up:
Tropical Mango Twist
Swap half the passion fruit pulp with ripe mango puree. The mango adds a mellow sweetness that complements the tartness, creating a layered tropical flavor that’s perfect for summer gatherings.
Chocolate‑Infused Indulgence
Incorporate 2 tablespoons of melted dark chocolate into the custard before adding the gelatin. The chocolate’s bitterness balances the fruit’s acidity, turning the dessert into a decadent, chocolate‑fruit fusion.
Almond Crunch Variation
Replace the graham cracker crumbs with almond flour and add 1/4 cup of toasted slivered almonds to the crust. The nutty flavor and crunch provide a sophisticated twist that pairs beautifully with the tropical fruit.
Minty Fresh Upgrade
Add a handful of fresh mint leaves to the custard and then blend until smooth. The mint offers a refreshing contrast that brightens the overall flavor profile, making it ideal for a post‑lunch treat.
Spiced Pumpkin Variation
For a seasonal twist, blend in a tablespoon of pumpkin puree and a pinch of cinnamon. This combination turns the dessert into a warm, fall‑themed treat while retaining its creamy texture.
Citrus Burst Finale
Finish the dessert by drizzling a thin layer of fresh orange zest oil over the top. The citrus oil adds a glossy sheen and a subtle citrus punch that enhances the passion fruit’s natural zing.
Storing and Bringing It Back to Life
Fridge Storage
Store the chilled dessert in an airtight container for up to 5 days. Keep it in the coldest part of your refrigerator to maintain its firmness. The crust will stay crisp, and the custard will remain creamy.
Freezer Friendly
For longer storage, wrap the dessert tightly in plastic wrap and place it in a freezer bag. It will keep well for up to 3 months. When you’re ready to serve, thaw it in the refrigerator overnight. The texture may soften slightly, but the flavor remains intact.
Best Reheating Method
If you prefer a slightly warmer dessert, reheat individual slices in the microwave for 10–15 seconds. Add a tiny splash of water before heating; this creates steam that brings back the custard’s silky texture. Serve immediately for the best experience.