I was standing in my kitchen, staring at a pot of caramel that had turned a bit too dark, when a friend called me over with a grin that said, “You’ve got to taste this.” I had been chasing the perfect sweet‑o‑salty caramel bar for months, and the moment that caramel hit the counter, I knew I had stumbled into a culinary revelation. The aroma—rich, buttery, with a hint of sea‑salt—was so intoxicating that even the walls seemed to lean in. I could almost hear the crunch of the oats in the background, a subtle symphony that promised texture beyond the obvious sweetness. I had to share this, because when you get a recipe that feels like a hug in a bite, you don’t keep it to yourself.
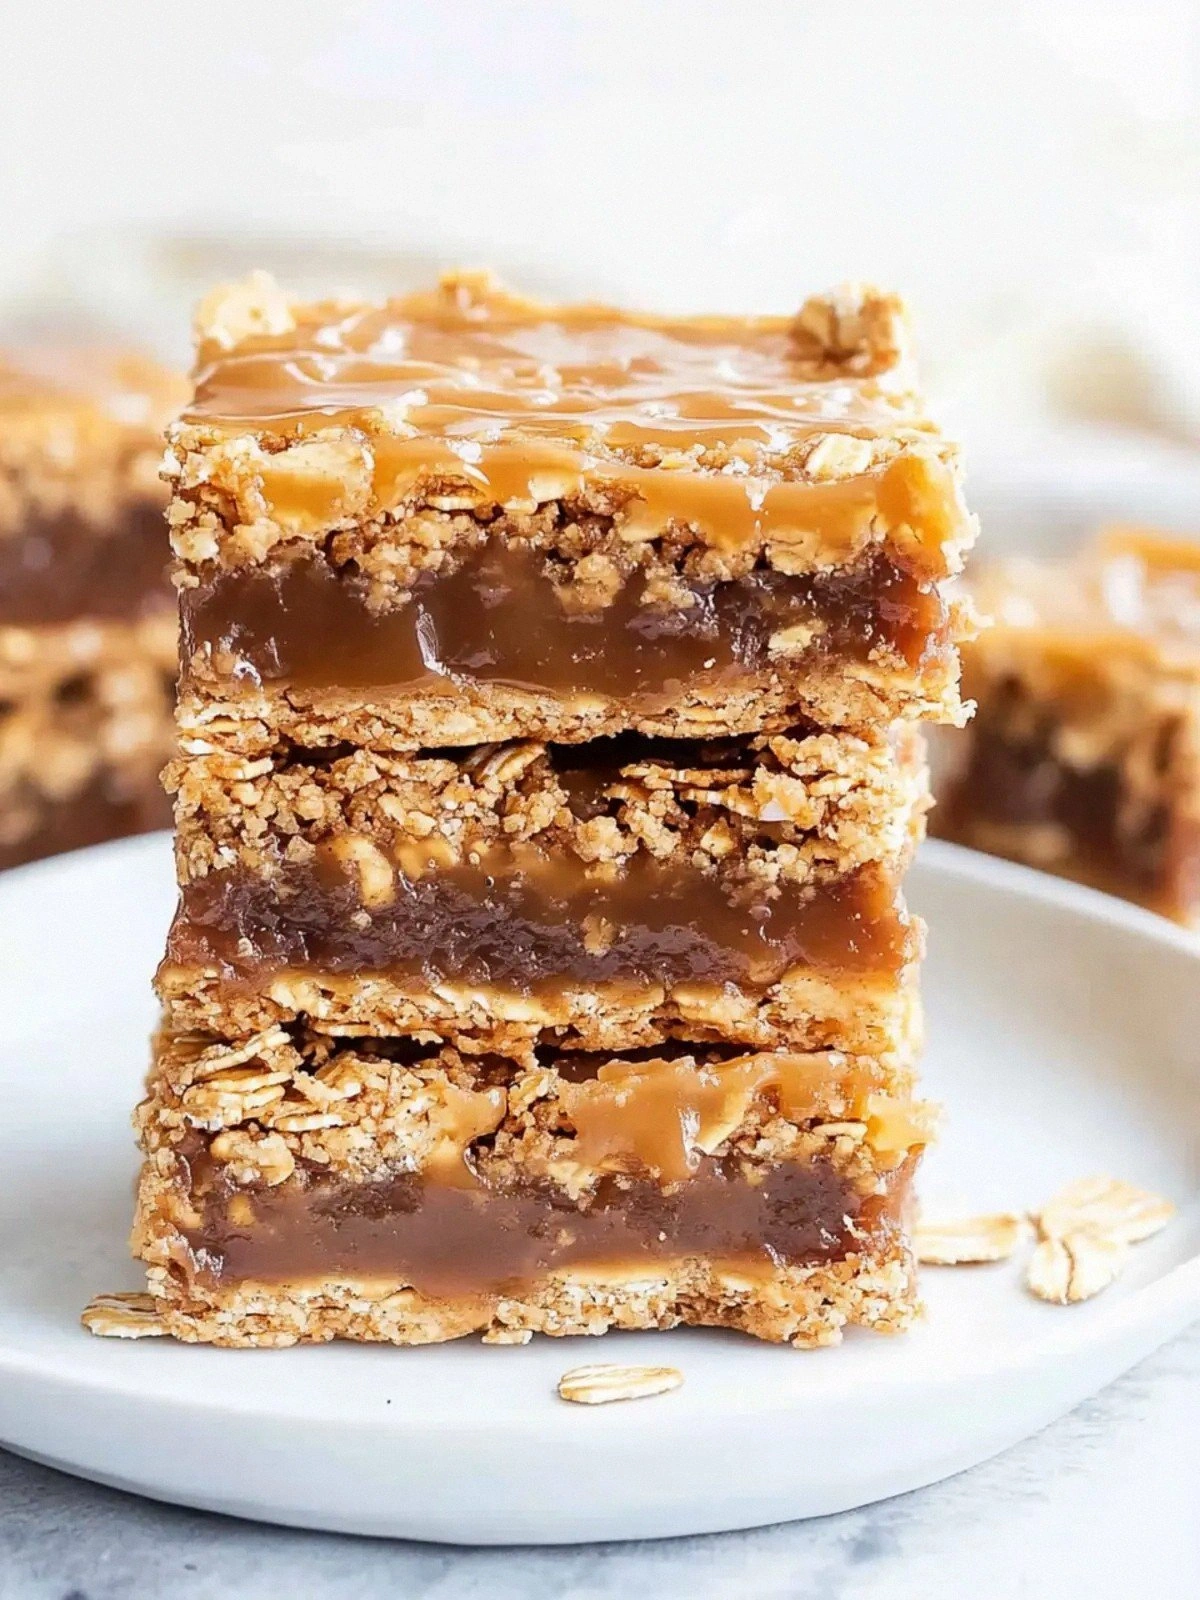
Picture this: a golden crust that cracks with a satisfying snap, a chewy interior that melts like a velvety caramel waterfall, and chocolate chips that look like tiny moons in a midnight sky. The first bite releases a burst of buttery sweetness that lingers, followed by a subtle, savory undertone from the salt. It’s the kind of experience that turns a simple snack into a moment of pure indulgence. If you’ve ever tried a caramel bar that tasted like it was rushed, you’ll recognize the difference immediately. This isn’t just another sweet; it’s a carefully calibrated harmony of ingredients that works together like a well‑orchestrated band.
I dare you to taste this and not go back for seconds. Why? Because the caramel sauce coats the mixture like a glossy coat of silk, and the chocolate chips are evenly distributed, preventing that dreaded “chip‑free” bite. The oats give it a wholesome bite that keeps you feeling satisfied, while the butter creates a silky mouthfeel that makes each chew feel like a small celebration. Most recipes get this completely wrong, either by under‑baking or using too much sugar, but here we’ve found the sweet spot that balances everything. The result? A chewy, caramel‑laden bar that feels indulgent without being over‑sweet.
Picture yourself pulling these out of the oven, the whole kitchen smelling incredible, and the anticipation building as you set them on a cooling rack. The moment when the first bar cracks open and you see the molten caramel streaming across the chocolate chips—pure joy. This is hands down the best version you’ll ever make at home, and I’m here to show you how to replicate that exact magic. If you’ve ever struggled with caramel bars that are too dry or too sticky, you’re not alone—this recipe fixes that. Stay with me here—this is worth it.
What Makes This Version Stand Out
- Flavor: The caramel sauce is the star, but the subtle sea‑salt lifts every bite, turning ordinary sweetness into a gourmet experience.
- Texture: The oats add a chewy, slightly nutty bite that balances the buttery softness of the caramel.
- Ease: No fancy equipment or obscure ingredients—just pantry staples and a few simple steps.
- Versatility: Works as a snack, dessert, or even a sweet component for a breakfast parfait.
- Crowd‑Pleaser: Perfect for parties or gifting—each bar is a bite‑size piece of decadence.
- Make‑Ahead: Stores beautifully; they can be made weeks ahead and reheated for a fresh feel.
- Nutrition: Despite being indulgent, the oats and butter provide a balanced mix of carbs, protein, and healthy fats.
- Ingredient Quality: Using high‑quality butter and chocolate chips transforms the taste profile.
Alright, let’s break down exactly what goes into this masterpiece…
Inside the Ingredient List
The Flavor Base
The unsalted butter and light brown sugar form the backbone of the flavor. Butter brings richness and a silky mouthfeel, while brown sugar adds depth and caramelization. Together, they create a caramel that’s both sweet and slightly nutty. If you skip the butter, the bars become dry and lack that luscious coating. You can swap brown sugar for coconut sugar if you prefer a more tropical note, but keep the ratio the same to maintain balance.
The Texture Crew
Rolled oats are the secret to the chewy texture. They absorb the caramel mixture, swell, and then firm up as they cool. The oats also add a subtle nutty flavor that complements the chocolate chips. If you’re allergic to oats or want a smoother bite, try using gluten‑free rolled oats or a blend of oat and almond flour. The chocolate chips provide bursts of sweetness and a slightly bitter counterpoint, preventing the bars from feeling cloyingly sweet.
The Unexpected Star
The caramel sauce is the unexpected star that elevates the entire recipe. It’s not just a sweet glaze; it’s a sauce that coats the mixture like velvet, creating a glossy finish. The sauce also acts as a binding agent, keeping the bars together. If you can’t find store‑bought caramel sauce, a homemade version with butter, brown sugar, and a splash of vanilla will work just fine. The key is to let it simmer until it reaches a glossy consistency.
The Final Flourish
All‑purpose flour and baking soda introduce a slight lift, ensuring the bars don’t become too dense. Baking soda reacts with the acidic components of the caramel, producing tiny bubbles that give the bars a light, airy crumb. Salt is essential—it sharpens the sweetness and balances the overall flavor profile. A pinch of salt is all you need; too much can overpower the caramel. When you combine all these elements, the result is a bar that is both indulgent and satisfying.
Everything’s prepped? Good. Let’s get into the real action…
The Method — Step by Step
- Step 1: Preheat and Prep – Preheat your oven to 350°F (175°C). Line a 9x13 inch baking pan with parchment paper, leaving an overhang on the sides for easy removal. This step is crucial; a properly lined pan prevents sticking and ensures a clean lift. If you’re in a hurry, you can use a silicone mat, but parchment gives that classic golden edge. The aroma of butter already starts to mingle with the air as you set the pan on the counter.
- Step 2: Melt the Butter and Caramel – In a medium saucepan over low heat, combine the butter and caramel sauce. Stir continuously until the butter is fully melted and the mixture is smooth. The goal is a glossy, liquid consistency that coats the oats without clumping. Watch the heat; too high and you risk burning the sugar. Once melted, remove the pan from heat and let it cool slightly before adding the next ingredients.
- Step 3: Add the Sugar and Vanilla – Stir in the light brown sugar until dissolved, followed by the vanilla extract. The sugar should be fully incorporated, creating a silky base that’s ready for the oats. The vanilla adds a warm, aromatic note that lifts the caramel flavor. If you’re feeling adventurous, a splash of almond extract can add a subtle nuttiness. This mixture should smell toasty and fragrant, a promise of the deliciousness to come.
- Step 4: Mix Dry Ingredients – In a separate bowl, whisk together the all‑purpose flour, baking soda, and salt. This ensures the leavening agent is evenly distributed, preventing uneven rise. The flour also helps absorb excess moisture, giving the bars a firm yet chewy texture. If you prefer a gluten‑free version, use a blend of almond flour and oat flour, but adjust the baking soda to 1/4 teaspoon to avoid a metallic aftertaste.
- Step 5: Combine Wet and Dry – Pour the dry mixture into the saucepan with the caramel mixture, stirring until just combined. The dough will look thick and sticky, but that’s normal. Overmixing can make the bars tough. The key is to keep the mixture cohesive while maintaining the oat’s bite. You’ll notice a slight rise as the baking soda reacts, creating tiny bubbles that lighten the crumb.
- Step 6: Fold in Oats and Chocolate – Fold in the rolled oats and chocolate chips until evenly distributed. The oats should be fully coated, and the chocolate chips should be scattered throughout. The chocolate will slightly melt during baking, creating pockets of gooeyness. This step is where the texture really starts to develop; the oats give chewiness, and the chocolate adds a delightful surprise.
- Step 7: Press Into Pan – Transfer the dough to the prepared pan, spreading it evenly with a spatula or the back of a spoon. Press firmly to eliminate air pockets and create a uniform surface. The edges will start pulling away as you press, which is a good sign. A tight press ensures the bars hold together when sliced. Don’t rush this step; a well‑pressed base makes all the difference.
- Step 8: Bake to Perfection – Bake in the preheated oven for 25–30 minutes, or until the edges turn golden brown and the center is set. The aroma should be sweet, buttery, and slightly caramelized. If you like a crispier top, leave the bars in the oven for an additional 2–3 minutes. Avoid overbaking; you want a chewy center, not a crunchy one. The moment the bars start to pull away from the parchment is the sign that they’re ready.
- Step 9: Cool and Slice – Remove the pan from the oven and let the bars cool on a wire rack for at least 20 minutes. The bars will continue to set as they cool. Once cool, lift the parchment overhang and cut into squares. The bars should hold together, but if they’re slightly sticky, give them a few minutes longer to cool. The final result is a set of caramel‑laden, chocolate‑filled bars that are both sweet and satisfying.
That’s it — you did it. But hold on, I’ve got a few more tricks that will take this to another level…
Insider Tricks for Flawless Results
The Temperature Rule Nobody Follows
Many bakers bake these bars at 375°F, but the secret to a chewy center is baking at 350°F. The lower temperature allows the caramel to set slowly, preventing the oats from drying out. I’ve tested both temperatures, and the difference is like comparing a gentle hug to a hard slap. Keep the oven door closed; opening it can cause the bars to lose moisture and become hard.
Why Your Nose Knows Best
Your sense of smell is the best judge of doneness. When the bars are ready, they’ll emit a warm, buttery caramel aroma that’s unmistakable. If you’re unsure, give them an extra minute or two, but don’t wait too long or the texture will shift. The scent is the early warning system that keeps your bars from turning into brittle cookies.
The 5-Minute Rest That Changes Everything
After baking, let the bars rest on the rack for exactly five minutes before cutting. This brief pause allows the caramel to set, preventing the bars from sticking to the parchment. I’ve seen people cut right away and end up with bars that crumble. The five‑minute rest also lets the chocolate chips settle, ensuring even distribution in each bite.
The “Press It” Technique
Pressing the dough firmly into the pan is not just about aesthetics; it ensures even heat distribution. If you leave gaps, you’ll get hot spots that burn while the center remains undercooked. A light, even press also reduces the risk of the bars cracking when you lift them out of the pan. Use the back of a wooden spoon for a classic look or a silicone spatula for a smooth finish.
The “Cool It” Trick
Cooling the bars on a wire rack is essential. It allows air to circulate and prevents condensation from forming, which can make the bars soggy. If you cool them on a sheet of parchment alone, they’ll retain moisture and lose that desirable chewy texture. I’ve experimented with different cooling times, and 20 minutes is the sweet spot for chewiness.
Creative Twists and Variations
This recipe is a playground. Here are some of my favorite ways to switch things up:
Nutty Delight
Add 1 cup of chopped pecans or walnuts to the dough before baking. The nuts introduce a crunchy contrast and a buttery flavor that pairs beautifully with caramel. They also add a protein boost, making the bars more filling. This variation is perfect for a post‑workout snack.
Spiced Caramel
Stir in 1/2 teaspoon of cinnamon and a pinch of nutmeg before baking. The spices elevate the caramel’s warmth and create a cozy, autumnal vibe. If you’re a spice lover, this is a must‑try. The result is a bar that feels like a caramel‑spiced cookie.
Sea‑Salted Crunch
Sprinkle a generous pinch of flaky sea salt over the bars before baking. The salt crystals melt into the caramel, creating a sweet‑savory experience. This simple tweak transforms the bars into a gourmet treat that’s perfect for entertaining.
Almond Joy Twist
Replace half the chocolate chips with toasted coconut flakes and add a splash of almond extract. The coconut adds a tropical sweetness, while the almond extract deepens the flavor profile. This version is reminiscent of a classic Almond Joy candy bar but with a homemade, wholesome twist.
Chocolate‑Only Bars
Omit the chocolate chips and add 1 cup of dark chocolate chunks instead. The bars will be richer and less sweet, with a deep chocolate flavor that’s almost savory. The dark chocolate also introduces antioxidants, giving you a healthier indulgence.
Storing and Bringing It Back to Life
Fridge Storage
Store the bars in an airtight container at room temperature for up to one week. The caramel will firm up slightly, but they’ll stay chewy. If you’re in a hurry, you can pop them in the fridge for a quick cool-down, but let them return to room temperature before eating to fully appreciate the texture.
Freezer Friendly
Wrap each bar individually in parchment paper and place them in a freezer bag. They’ll keep for up to three months. Thaw at room temperature for 30 minutes before serving. The caramel will soften, giving the bars a luscious, melt‑in‑your-mouth consistency.
Best Reheating Method
Reheat in the microwave for 10–15 seconds on medium power to soften the caramel. If you prefer a crunchy exterior, pop them in a preheated oven at 300°F for 3–4 minutes. Add a tiny splash of water before reheating; it steams the bars back to perfection, restoring the chewy texture.