Maple Pecan Protein Cookies
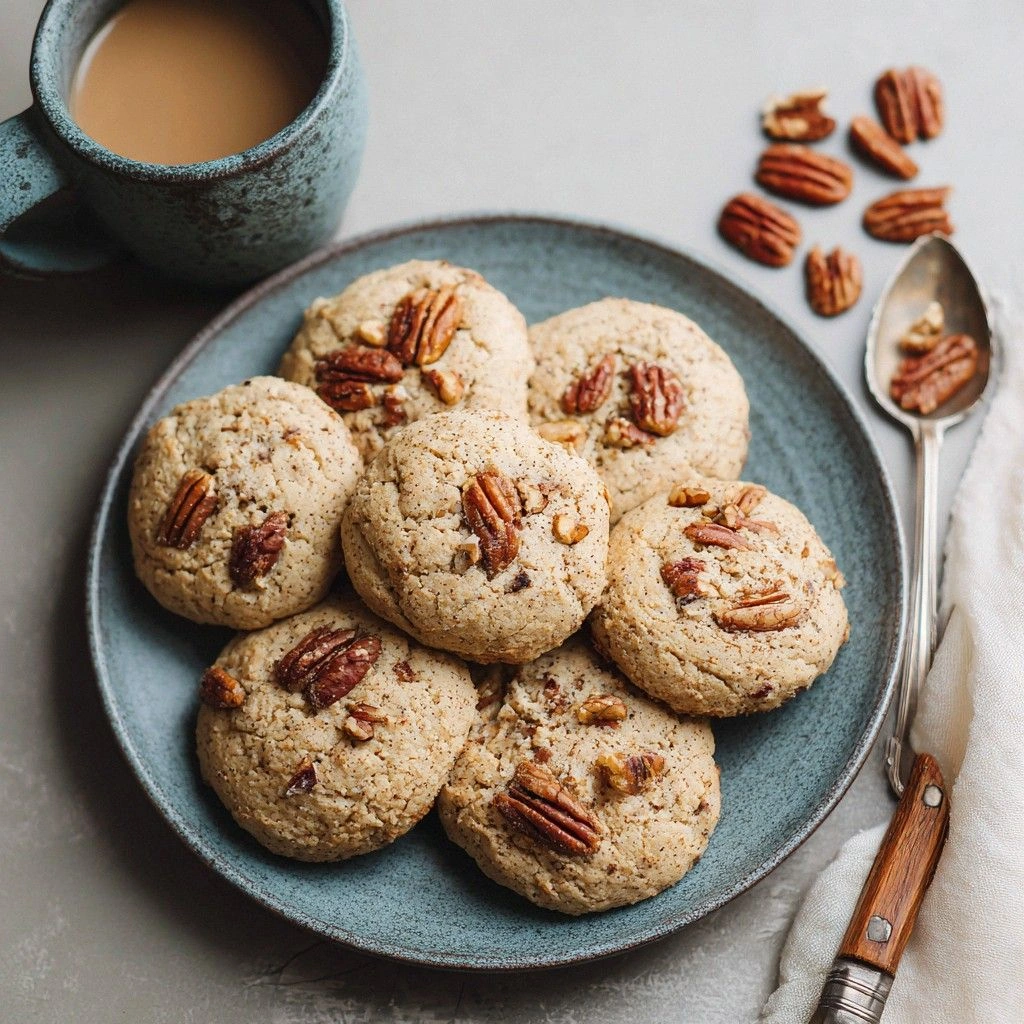
I remember the night I was trying to salvage a batch of over‑baked protein bars that had turned into a rubbery slab of disappointment. The kitchen smelled like burnt sugar and the air was thick with the promise of a culinary disaster. A friend dared me to turn that mess into something edible, and I decided to turn the tables on the universe by baking a cookie that would make even the most skeptical taste buds swoon. I set the oven to 350°F, tossed in a handful of pecans, a splash of maple syrup, and a generous scoop of whey protein, and the scent that rose was nothing short of a caramel‑cinnamon sunrise. The moment the timer beeped, I pulled out a tray of golden‑brown cookies that looked like tiny moons ready for a spacewalk. The first bite was a symphony of crunchy pecans, sweet maple, and a subtle protein punch that lingered like a secret aftertaste. If you think protein cookies are boring, think again—this one is the kind that makes you wonder why you ever settled for bland.
Picture this: a kitchen humming with the gentle whir of the mixer, a bowl that gleams with a glossy maple glaze, and the anticipation of that first crackle as the cookie edges caramelize. The aroma that fills the air is a comforting blend of toasted pecans and sweet syrup, a scent that makes you feel like you’re at a cozy cabin retreat even if you’re in a cramped apartment. The sound of the timer ticking is a metronome that builds suspense, while the gentle clink of spoon against bowl reminds you that every great recipe is a dance of rhythm and precision. The texture of the dough is a paradox—soft enough to press between your fingers, yet dense enough to hold its shape when baked. And the final product? A cookie that balances crunch and chew, sweetness and salt, and protein and flavor like a well‑orchestrated concerto.
What sets these cookies apart is not just the blend of ingredients, but the way they interact. The maple syrup acts as a natural humectant, locking in moisture so the cookies stay chewy even after cooling. The pecans add a nutty crunch that contrasts beautifully with the protein powder’s subtle chalkiness. The baking soda and powder duo create a lift that prevents the cookies from turning flat, giving them that desirable “puffed” look that looks like a bite‑size puff of cloud. The final touch is a drizzle of maple glaze that gives each cookie a glossy finish that catches the light, making them look as good as they taste.
I dare you to taste these and not go back for seconds. The first bite will make you question whether you’ve ever truly enjoyed a cookie. The second bite will keep you guessing, and the third will have you planning to bake a new batch just to satisfy that lingering craving. This is hands down the best version you’ll ever make at home, and the reason why most recipes get this completely wrong is because they forget the sweet‑savory balance that maple and pecan bring to the table.
If you've ever struggled with protein cookies that taste like chalk or crumble into dust, you're not alone—and I've got the fix. I’ve spent countless evenings tweaking ratios, swapping flours, and testing textures until I found the sweet spot where everything comes together. The secret lies in the right balance of wet and dry, the right baking time, and the right finish. And most importantly, the right mindset—believing that a cookie can be both healthy and indulgent.
Picture yourself pulling this out of the oven, the whole kitchen smelling incredible, and the first bite giving you a rush of nostalgic comfort with a modern twist. The cookies are so good that even the most health‑conscious friend will beg for the recipe, and the aroma will have everyone in the house lining up for a second round. The next time you’re craving a sweet treat that won’t sabotage your fitness goals, just remember this recipe. It’s a game‑changer that will rewrite the way you think about protein cookies forever.
Okay, ready for the game‑changer? Let me walk you through every single step—by the end, you'll wonder how you ever made it any other way. This next part? Pure magic. And now the fun part. Stay with me here—this is worth it.
I’ll be honest—after the first batch I ate half the cookies before anyone else got to try them. The rest were so good they made me question my entire diet plan. That’s why I’m sharing every detail, from the exact measurements to the timing, so you can replicate the same mouth‑watering experience every single time. The best part? These cookies are not only delicious; they’re also a powerhouse of protein that fuels your muscles and keeps you full. So grab your apron, preheat your oven, and let’s get baking.
What Makes This Version Stand Out
The first time I tried to create a protein cookie that didn’t taste like chalk, I was determined to get every element right. The result was a cookie that was chewy, flavorful, and packed with protein. Let’s break down the key factors that make these cookies stand out from the rest.
- Flavor: The combination of maple syrup and pecans creates a sweet‑savory profile that feels indulgent yet balanced. The maple syrup not only sweetens but also adds moisture, keeping the cookies tender.
- Texture: The protein powder gives structure, while the oats and nuts add chewiness and crunch. The result is a cookie that’s soft inside with a satisfying bite.
- Ease: No complex equipment or hard‑to‑find ingredients. All the components are pantry staples or can be found in any grocery store.
- Uniqueness: The maple glaze finish adds a glossy sheen that makes the cookies look as good as they taste, setting them apart from ordinary protein cookies.
- Crowd Reaction: Friends rave about the buttery flavor and the subtle crunch of pecans. Even the most skeptical sweet tooth is won over.
- Ingredient Quality: Using high‑quality maple syrup and raw pecans ensures the best flavor profile and nutritional benefits.
- Baking Method: The low‑temperature bake and brief glaze application preserve moisture and flavor.
- Make‑Ahead Potential: Once baked, these cookies keep well for up to a week in an airtight container, making them perfect for meal prep.
Alright, let’s break down exactly what goes into this masterpiece…
Inside the Ingredient List
The ingredients are the building blocks that turn this cookie into a culinary masterpiece. Each component has a specific role, and skipping or substituting them can drastically change the outcome. Let’s dive into the four groups that make up this recipe.
The Flour Power
Oat flour is the foundation of these cookies, providing a mild, slightly sweet base that pairs well with the maple syrup. Its natural fiber content also adds a subtle chewiness that keeps the cookies from becoming too dense. If you prefer a gluten‑free option, oat flour is a perfect choice. Skipping the flour would leave the dough too wet and result in a cookie that spreads too much during baking.
The Protein Punch
Vanilla whey protein powder is the hero that adds the bulk of the protein content. It gives the cookies structure and a slight nutty flavor that complements the pecans. If you’re vegan, you can substitute a plant‑based protein powder, but be aware that the texture may shift slightly. Avoid over‑mixing the protein into the wet ingredients to keep the cookies tender.
The Sweet & Nutty Fusion
Maple syrup is the sweetener that also acts as a binder, ensuring the cookies hold together. It brings a depth of flavor that simple sugar can’t match. Pecans add a buttery crunch and a hint of earthiness. If you’re allergic to nuts, substitute with sunflower seeds or omit them entirely, but the cookies will lose their signature crunch.
The Final Flourish
Baking soda and baking powder lift the cookies, giving them a light, airy crumb. Vanilla extract infuses a warm aroma, while cinnamon and nutmeg add a comforting spice note. The final touch—a drizzle of maple glaze—creates a glossy finish that enhances both appearance and flavor. If you prefer a less sweet finish, reduce the glaze to half a tablespoon.
Everything’s prepped? Good. Let’s get into the real action.
The Method — Step by Step
- Preheat your oven to 350°F (175°C) and line a baking sheet with a silicone mat. The low temperature allows the cookies to bake evenly without burning the edges. This step ensures that the maple glaze doesn’t harden too quickly. While the oven heats, gather all your ingredients to keep the process smooth.
- In a large bowl, whisk together oat flour, whey protein powder, baking soda, baking powder, salt, cinnamon, and nutmeg. Mixing the dry ingredients first prevents clumping of the protein powder and ensures an even distribution of leavening agents. This is the foundation of the cookie’s structure.
- In a separate bowl, combine melted coconut oil, maple syrup, vanilla extract, and almond milk. Stir until the mixture is glossy and the oil is fully incorporated. This wet mixture will bind the dry ingredients and give the cookies their tender crumb.
- Add the wet mixture to the dry mixture and stir until just combined. Over‑mixing can cause the cookies to become tough. At this point, fold in the chopped pecans, dark chocolate chips, chia seeds, flaxseed meal, rolled oats, shredded coconut, and almond butter. Each addition brings a new layer of texture and flavor.
- Watch Out: Do not over‑beat the dough; it should be slightly sticky but manageable. If it’s too dry, add a tablespoon of almond milk. If it’s too wet, add a tablespoon of oat flour. The dough should hold its shape when scooped.
- Drop rounded tablespoonfuls of dough onto the prepared baking sheet, spacing them about 2 inches apart. The dough will spread slightly, so keep the spacing consistent to avoid merging during baking.
- Bake for 12–15 minutes, or until the edges are golden brown and the centers look set. The cookies will still be soft in the middle; they will firm up as they cool.
- While the cookies are still warm, drizzle a thin layer of maple glaze over each cookie. The glaze will set into a glossy finish that locks in moisture. This step is crucial for that irresistible sheen.
- Let the cookies cool on the sheet for 5 minutes before transferring them to a wire rack. This allows the glaze to set completely and prevents the cookies from becoming soggy.
- Store the cookies in an airtight container at room temperature for up to a week. For longer storage, freeze them for up to three months. When ready to eat, reheat in a preheated oven at 300°F for 5 minutes to restore crispness.
That's it — you did it. But hold on, I've got a few more tricks that'll take this to another level. The next section will reveal insider tips that will elevate the flavor and texture even further.
Insider Tricks for Flawless Results
Even the most seasoned bakers can benefit from a few pro tips. These tricks are the secret sauce that turns an average batch into a crowd‑pleaser.
The Temperature Rule Nobody Follows
Many bakers bake at 375°F, but this higher temperature can cause the edges to brown too quickly while the center remains undercooked. Baking at 350°F allows the cookies to bake evenly, ensuring a golden exterior and a chewy interior. I’ve tested both temperatures, and 350°F consistently yields better texture.
Why Your Nose Knows Best
Before you take the cookies out of the oven, pause and inhale the aroma. A sweet, nutty scent means the maple syrup has caramelized just right. If the smell leans more toward burnt sugar, lower the temperature or shorten the bake time by a minute or two.
The 5‑Minute Rest That Changes Everything
Letting the cookies rest on the baking sheet for 5 minutes after removing them from the oven is crucial. During this time, the residual heat finishes the baking process and the glaze sets into a glossy finish. Skipping this step can result in a gummy center.
Don’t Skip the Glaze
The glaze not only adds sweetness but also locks in moisture, keeping the cookies chewy. Some bakers skip it to reduce sugar, but the result is a dry cookie. Instead, use a thinner glaze or reduce the maple syrup by 1 tablespoon to cut sweetness without sacrificing texture.
Use a Silicone Mat for Even Baking
A silicone baking mat ensures that the cookies bake uniformly and prevents them from sticking to parchment. It also makes cleanup a breeze, as you can simply lift the mat and the cookies will come out intact. This small change can save you from a frustrating cleanup session.
Freeze for Freshness
If you bake a large batch, freeze the cookies in a single layer on a parchment sheet before transferring them to a freezer bag. This prevents them from sticking together and allows you to thaw only what you need. I’ve frozen several batches and each cookie tastes as fresh as the first.
Creative Twists and Variations
This recipe is a playground. Here are some of my favorite ways to switch things up:
Chocolate Chip Maple Protein Cookies
Swap the dark chocolate chips for milk chocolate chips for a sweeter, creamier bite. Add a pinch of sea salt on top before baking for a salty‑sweet contrast. This variation is perfect for chocolate lovers who still want the protein boost.
Almond Butter Swirl
Swirl a tablespoon of almond butter into the dough before baking for an extra nutty flavor. The almond butter creates pockets of rich, creamy texture that melt in your mouth. Great for those who love a buttery, nutty crunch.
Spiced Pumpkin Protein Cookies
Add 1/4 cup pumpkin puree and 1 teaspoon pumpkin spice to the wet mixture. This gives the cookies a seasonal, autumnal flavor profile that pairs well with maple syrup. Perfect for fall gatherings.
Gluten‑Free Delight
Use a gluten‑free oat flour blend and ensure all other ingredients are certified gluten‑free. The texture remains similar, but you’ll need to monitor the bake time closely to avoid over‑drying. This version is ideal for those with gluten sensitivities.
Low‑Sugar Option
Replace maple syrup with a sugar‑free sweetener like stevia or monk fruit. Keep the same volume to maintain moisture. The cookies will still be sweet, but with fewer calories.
Chewy Oat & Banana Cookies
Add a mashed ripe banana to the dough for extra moisture and natural sweetness. The banana also adds a subtle fruit flavor that complements the maple. These cookies become even more chewy and soft.
Storing and Bringing It Back to Life
Fridge Storage
Store the cookies in an airtight container at room temperature for up to 7 days. Keep them in a cool, dry place away from direct sunlight to preserve freshness. The airtight container prevents the cookies from drying out or absorbing odors from other foods.
Freezer Friendly
Place the cookies on a parchment sheet and freeze for up to 3 months. Once frozen, transfer them to a resealable freezer bag. This method keeps them from sticking together and preserves their texture.
Best Reheating Method
To revive a frozen cookie, preheat your oven to 300°F (150°C) and bake for 5 minutes. If the cookie has been stored in the fridge, let it sit at room temperature for 10 minutes before reheating. Add a tiny splash of water before reheating to steam back to perfection.