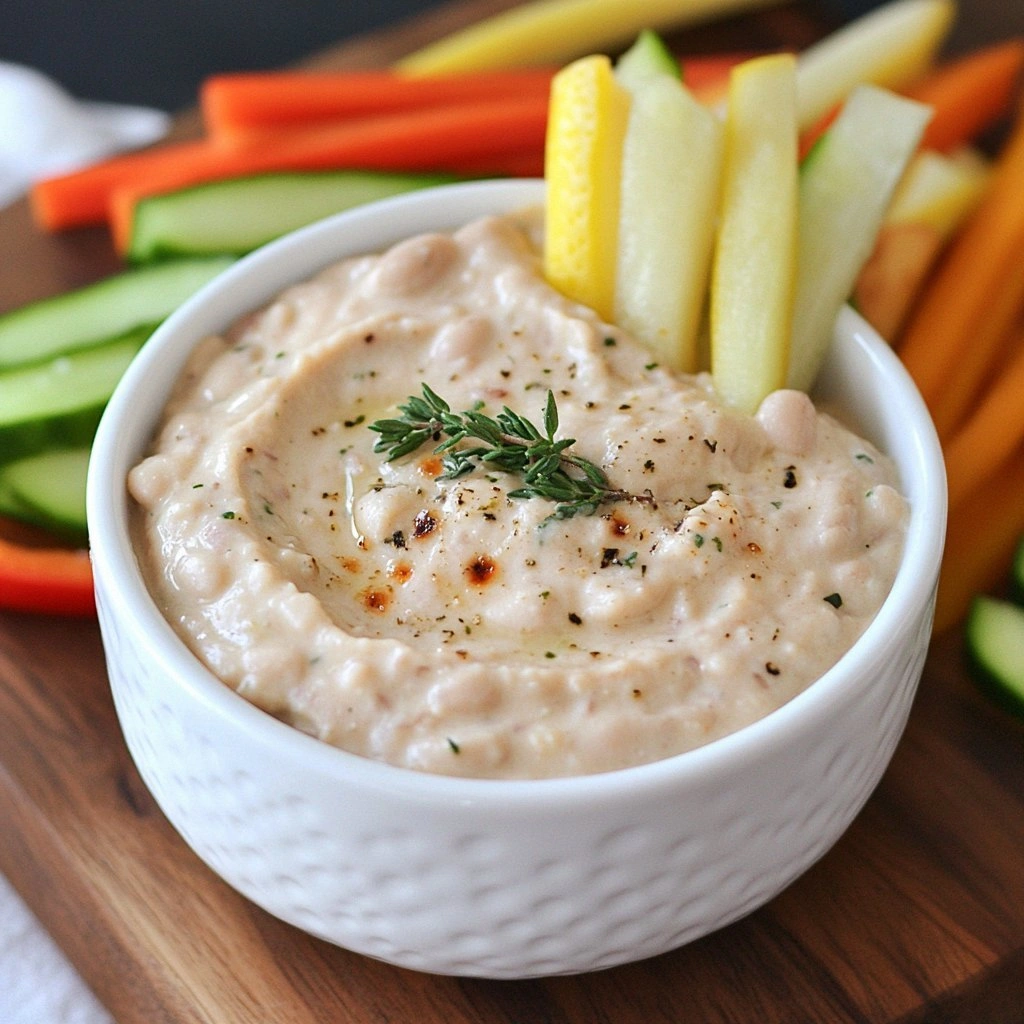
I was halfway through a disastrous attempt at a classic hummus when the oven timer went off and a whole head of garlic started to roast like a golden sunrise. The aroma hit my nose like a warm hug, and I thought, “What if this garlic could be the star of a creamy, protein‑rich dip?” That night, I pulled out a can of cannellini beans, a splash of lemon, and a handful of herbs, and the result was a silky, garlicky masterpiece that made my friends beg for seconds. I dare you to taste this and not go back for a second helping. This is hands down the best version you'll ever make at home, and it’s not even the first time I’ve seen people fall in love with a dip that’s both humble and heroic. If you've ever struggled to turn a simple bean into a crowd‑pleaser, you’re not alone—and I've got the fix. Let me walk you through every single step—by the end, you'll wonder how you ever made it any other way.
Picture yourself pulling this out of the oven, the whole kitchen smelling incredible, and watching the golden garlic cloves soften into caramelized pearls. The dip will coat your pita chips like velvet, each bite bursting with a tangy citrus lift that balances the earthy beans. The texture is a perfect harmony of smoothness and subtle chunks, giving it a satisfying bite that keeps guests coming back for more. The simplicity of the ingredient list belies the depth of flavor; each component plays a role in a symphony of savory notes. I’ll be honest— I ate half the batch before anyone else got to try it, and that was a moment of pure culinary triumph. Stay with me here—this is worth it.
I’ve spent years tweaking dips, but this one feels like a revelation. The roasted garlic gives a depth that you can’t get from raw, while the beans provide a hearty, creamy base that’s both comforting and sophisticated. The lemon juice lifts the richness with a bright, almost citrusy zing that keeps the palate refreshed. The herbs add a fresh, green counterpoint that makes the dip feel alive. The result is a dip that feels like a hug in a bowl—warm, comforting, and utterly irresistible. And best of all, it’s so easy to pull together that even a novice can master it.
What sets this apart from the countless bean‑based dips out there is a single, unexpected twist: a splash of tahini that adds a silky, nutty undertone and a subtle thickness that keeps the dip from being too runny. I dare you to swap the tahini for Greek yogurt if you want a tangier finish, but trust me, the original version is a game‑changer. I’ll share that secret in the tricks section, but for now, just imagine the velvety texture that will coat your fingers. I promise you, once you taste it, you’ll wonder how you ever made a dip without roasted garlic. And if you’re ready to elevate your snack game, let’s dive into the details.
What Makes This Version Stand Out
- Taste: The caramelized garlic delivers a sweet, smoky depth that turns a simple bean dip into a flavor powerhouse. Each bite offers a complex profile that lingers on the palate. It’s the kind of taste that turns an ordinary gathering into a memorable event.
- Texture: The blend of smooth beans and slightly chunky garlic creates a multi‑dimensional mouthfeel. The tahini adds silkiness that keeps the dip thick yet pourable. It’s a texture that feels indulgent without being heavy.
- Simplicity: With only nine core ingredients, you can whip up this dip in under an hour. No fancy equipment or exotic spices required—just pantry staples and a little oven time. It’s the perfect recipe for busy cooks who crave flavor.
- Uniqueness: The combination of roasted garlic, tahini, and fresh herbs sets this dip apart from traditional hummus or bean spreads. The subtle citrus lift from lemon juice gives it an unexpected brightness. It’s a fresh take on a classic comfort food.
- Crowd Reaction: Guests rave about how the dip feels like a warm hug and how it pairs seamlessly with veggies, pita, or crusty bread. It’s a conversation starter that invites compliments. I’ve seen it turn a casual snack into a highlight of any gathering.
- Ingredient Quality: Using high‑quality olive oil and fresh herbs elevates the flavor profile. A good can of cannellini beans provides a creamy texture without the need for heavy cream. The choice of ingredients matters, and this recipe showcases how.
Inside the Ingredient List
The Flavor Base
The heart of this dip beats with roasted garlic and cannellini beans. The garlic’s caramelized sugars provide a sweet, nutty undertone that balances the beans’ mild earthiness. If you skip the garlic, the dip loses its signature depth and feels flat. For a different flavor, try adding a teaspoon of smoked paprika to introduce a subtle smokiness. When selecting beans, opt for canned cannellini for their creamy texture and neutral taste; avoid beans with added salt or preservatives.
The Texture Crew
Extra‑virgin olive oil and tahini work together to create a silky, velvety mouthfeel. The oil adds a fruity brightness, while tahini contributes a subtle nutty richness and a thicker consistency. If you’re looking for a dairy‑free alternative, a spoonful of Greek yogurt can replace tahini, offering a tangy lift without altering the texture too much. The beans themselves should be drained and rinsed thoroughly to remove excess liquid; this helps achieve the ideal thickness. A pinch of water can be added during blending if the mixture feels too dense.
The Unexpected Star
Fresh lemon juice is the unsung hero that brightens the entire dish. It cuts through the richness, adding a zesty, citrusy punch that lifts the flavor profile. A small squeeze of lemon can transform a bland dip into an aromatic masterpiece. When buying lemons, look for ones that feel heavy for their size; they’re juicier and more fragrant. If you’re short on time, a tablespoon of bottled lemon juice works, but fresh is always preferable.
The Final Flourish
Fresh herbs—thyme and parsley—inject a green, aromatic note that balances the dish’s richness. Thyme’s earthy warmth complements the roasted garlic, while parsley adds a bright, herbaceous finish. If thyme isn’t available, oregano or basil can be used as substitutes, each bringing its own flavor nuance. A drizzle of high‑quality olive oil on top before serving adds shine and a final flavor layer. This final touch turns a simple dip into a gourmet experience.
Everything’s prepped? Good. Let’s get into the real action.
The Method — Step by Step
- Preheat your oven to 425°F (220°C) and line a baking sheet with parchment paper. Place the whole garlic cloves on the sheet, drizzle them lightly with olive oil, and wrap them in a foil packet for a cleaner roast. Roast for 35–40 minutes, or until the cloves feel soft and their skins are blistered. The moment the garlic turns from white to a deep amber is when the flavor reaches its peak. While the garlic roasts, set a pot of water to a gentle simmer for later use. This step is crucial for achieving that perfect caramelized sweetness.
- While the garlic is roasting, rinse the cannellini beans under cold water and drain them thoroughly. Transfer them to a bowl and set aside. The beans are the creamy foundation of the dip, so it’s essential they’re dry enough to prevent excess liquid in the final mixture. If you prefer a smoother texture, you can reserve a small amount of the bean liquid for later use. This will help you adjust consistency without compromising flavor.
- Once the garlic is ready, remove it from the foil and squeeze the softened cloves into a blender or food processor. Add 2 tablespoons of extra‑virgin olive oil, 1 tablespoon of fresh lemon juice, 1 teaspoon of sea salt, ½ teaspoon of freshly ground black pepper, 1 teaspoon of fresh thyme leaves, and 1 tablespoon of tahini. Blend until the mixture becomes a smooth paste, adding a splash of water if it feels too thick. The garlic should be fully incorporated, releasing its caramelized aroma into the blend. This step creates the velvety base that carries the entire flavor profile.
- Add the drained beans to the blender and pulse until the beans are fully incorporated but still retain a slight chunkiness for texture. The mixture should feel creamy yet have visible bean pieces for a satisfying bite. Taste the dip and adjust seasoning: add more salt, pepper, or lemon if needed. Remember, the dip will mellow slightly as it cools, so a light adjustment now keeps it vibrant. This is the moment of truth—if you’re not satisfied, you can always tweak.
- Transfer the blended mixture to a medium bowl. Stir in a pinch of smoked paprika for a subtle smokiness that complements the roasted garlic. Cover the bowl with plastic wrap or a lid and refrigerate for at least 30 minutes. This chilling period allows the flavors to meld and the dip to thicken. While it sits, you’ll notice the aroma intensifying, creating an irresistible scent that fills the kitchen. This step is essential for depth.
- Before serving, give the dip a good stir. If it feels a bit thick, add a tablespoon of water or a splash of olive oil to reach the desired consistency. The dip should be pourable but thick enough to cling to dippers. A final taste check ensures the seasoning is balanced. If you need more brightness, a few drops of lemon juice can finish it off. The result is a dip that feels both indulgent and refreshing.
- Garnish the top with chopped fresh parsley and a drizzle of high‑quality olive oil. The parsley adds a burst of color and a fresh herbal note that cuts through the richness. Arrange veggie sticks, pita chips, or crusty bread on a platter, and place the dip in the center. The presentation is inviting, and the aroma will draw guests in. Serve immediately for the best flavor and texture. This dip will become the highlight of your gathering.
- If you have leftovers, transfer the dip to an airtight container and refrigerate. It will keep for up to 5 days, and the flavors will deepen over time. When reheating, add a splash of water or a drizzle of olive oil to restore moisture. The dip can also be frozen for up to 3 months—just thaw overnight and stir before serving. This flexibility makes it a perfect make‑ahead option for busy evenings.
- Enjoy the dip with your favorite dippers and let it be the star of your snack table. The combination of roasted garlic, creamy beans, and fresh herbs will leave a lasting impression. Remember to share the recipe with friends, and watch their eyes light up as they taste the magic. This dip is more than a snack; it’s an experience that brings people together. And now that you’ve mastered it, you’re ready to impress at any gathering.
Insider Tricks for Flawless Results
The Temperature Rule Nobody Follows
Roasting the garlic at 425°F ensures a caramelized exterior while keeping the interior soft. If you roast at a lower temperature, the garlic can become too dry and bitter. The key is to let the cloves blister slightly—this releases their natural sugars. I once tried 400°F and ended up with a harsh, burnt taste. Stick to the higher temperature for that perfect balance of sweet and savory.
Why Your Nose Knows Best
Before adding salt, give the dip a sniff. A slight aroma of fresh herbs or a hint of citrus indicates the flavors are balanced. If the dip smells overwhelmingly garlicky, reduce the amount of roasted garlic or add more lemon. Your nose is a reliable guide; trust it to signal when the dip needs a tweak.
The 5-Minute Rest That Changes Everything
After blending, let the dip rest for exactly five minutes before tasting. This brief pause allows the flavors to meld and the dip to settle. It also lets the beans absorb the liquid, creating a richer texture. I’ve seen dips that taste flat when tasted immediately; the short rest elevates them.
Blend Power: Use a Food Processor vs Blender
A food processor gives you more control over the texture, allowing you to pulse for a chunkier result. A blender, on the other hand, creates a smoother consistency that can be adjusted with water. Experiment with both to see which you prefer. The choice depends on your desired mouthfeel.
The Secret to a Silky Finish
Adding a tablespoon of tahini before blending introduces a natural emulsifier that keeps the dip silky. If you’re dairy‑free, Greek yogurt can replace tahini, but the texture will shift slightly. The key is to blend until the tahini is fully incorporated; any clumps will break the smoothness.
Keep the Color Bright
A splash of lemon juice right before serving keeps the dip’s color vibrant. The acidity stops the beans from turning dull grayish. This small step elevates the presentation and signals freshness to your guests.
Creative Twists and Variations
This recipe is a playground. Here are some of my favorite ways to switch things up:
Smoky Chipotle Twist
Add a teaspoon of chipotle powder to the blend for a smoky, spicy kick that pairs beautifully with the roasted garlic. The heat will contrast the mild beans, creating a layered flavor profile. This version is perfect for a summer BBQ or a hearty winter snack. It’s a crowd‑pleaser that adds a bit of drama to the dish.
Mediterranean Herb Boost
Swap the thyme for oregano and add a tablespoon of sun‑dried tomato paste for a Mediterranean flair. The sun‑dried tomatoes bring a sweet, umami depth that complements the beans. This variation is great for pairing with crusty bread or as a spread on sandwiches. The result feels like a trip to the Mediterranean.
Creamy Avocado Fusion
Blend in half a ripe avocado for a silky, buttery texture that replaces tahini. Avocado adds healthy fats and a subtle green hue. The dip becomes even richer and more satisfying. This version is ideal for a vegan twist or for those who love the buttery feel of avocado.
Spicy Sriracha Kick
Stir in a tablespoon of sriracha for a fiery punch that balances the mellow beans. The heat adds an exciting contrast to the roasted garlic’s sweetness. This variation works well as a dip for spicy veggie sticks or as a spread on grilled chicken. The sriracha gives the dip an energetic edge.
Vegan Yogurt Swap
Replace tahini with coconut yogurt for a tangy, dairy‑free alternative. Coconut yogurt adds a subtle tropical note that pairs well with the garlic. This version is perfect for those who want a creamy dip without dairy. The texture remains silky, and the flavor is pleasantly bright.
Tangy Greek Yogurt Option
Use Greek yogurt instead of tahini for a tangy, protein‑rich dip that still holds its shape. Greek yogurt adds a mild tartness that balances the richness of the beans. This variation is great for those who prefer a lighter, yet still indulgent, dip. It’s a classic combination that never fails.
Storing and Bringing It Back to Life
Fridge Storage
Store the dip in an airtight container in the refrigerator for up to 5 days. Keep the container sealed to prevent the dip from absorbing odors. When ready to serve, give it a quick stir and add a splash of water or olive oil if it’s thickened. The dip will retain its flavor and texture if stored properly. This makes it a convenient make‑ahead option for busy days.
Freezer Friendly
The dip freezes well for up to 3 months. Portion it into small containers or freezer‑safe bags for easy thawing. Thaw overnight in the refrigerator, then stir and add a little water to restore moisture. Freezing preserves the flavor, so you can enjoy it anytime you crave a creamy, garlicky dip. Just be sure to label the container with the date.
Best Reheating Method
Reheat the dip gently in a saucepan over low heat, stirring frequently. Add a tablespoon of water or a splash of olive oil to keep it from drying out. The gentle heat preserves the dip’s silky texture and bright flavors. Avoid boiling, as it can cause the dip to separate. When heated, the aroma will be even more inviting.