I was halfway through a burnt lasagna, the kitchen smelling of charred onions and disappointment, when my phone buzzed with a text from my roommate: “We need protein bars for the road trip tomorrow. No time to bake.” I stared at the mess, the oven door stuck, and realized I had one hour before departure. I thought, “Why not create something quick, nutritious, and unforgettable?” That impulse turned into a culinary quest that would soon become my favorite no‑bake protein bar.
Imagine the warm, buttery aroma of melted nut butter mingling with the sweet whisper of maple syrup, as you stir it all together in a bowl that feels like a canvas. The texture is a promise—crisp yet chewy, the oats giving a hearty bite while the protein powder ensures a subtle, satisfying protein hit. The sound of the spoon gliding through the mixture is almost hypnotic, a steady rhythm that signals the recipe is taking shape. The first taste is a burst of nutty sweetness, followed by a subtle chocolate undertone if you choose to add the dark chips. The final feel is a smooth, cohesive mass that clings together like a well‑tied knot.
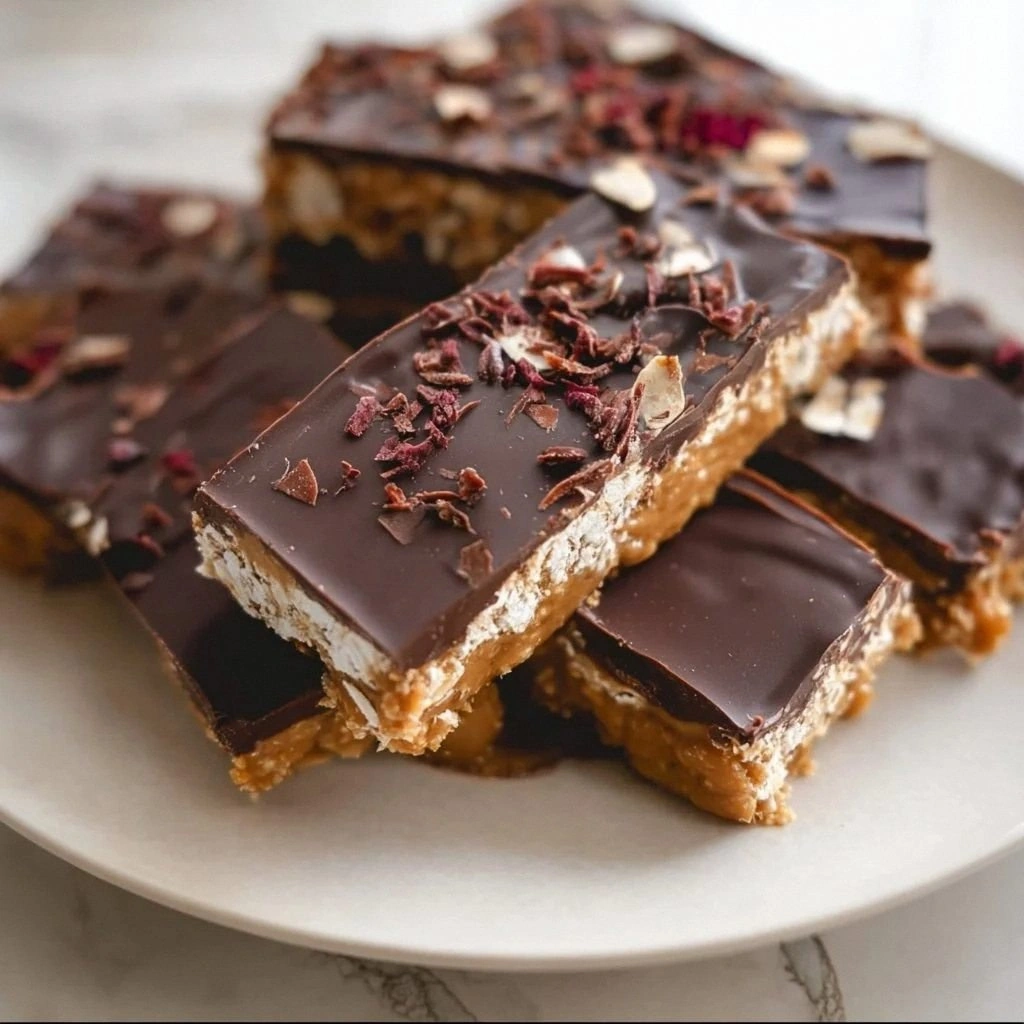
This version is not just another protein bar; it’s a masterclass in simplicity and flavor harmony. The secret lies in the balance of ingredients: rolled oats for structure, nut butter for binding, maple syrup for natural sweetness, protein powder for the muscle‑boosting punch, and a splash of vanilla for depth. Most recipes get this completely wrong, adding excess sugar or using the wrong type of butter, but here we keep it clean and straightforward. The twist? A subtle infusion of chia seeds that add crunch and omega‑3 without overpowering the flavor. By the time you finish, you’ll taste the difference between a mediocre bar and a bar that practically sings.
I dare you to taste this and not go back for seconds, because once you’ve had it, you’ll wonder why you ever settled for store‑bought. Picture yourself pulling this out of the bowl, the whole kitchen smelling incredible, and handing it to a friend who asks, “What’s the secret?” I’ll be honest—I ate half the batch before anyone else got to try it, and the rest of the day was just a blur of craving. If you've ever struggled with finding a quick, protein‑dense snack that doesn't feel like junk, you're not alone—and I've got the fix. Okay, ready for the game‑changer? Let me walk you through every single step—by the end, you'll wonder how you ever made it any other way.
What Makes This Version Stand Out
- Taste: The combination of nut butter and maple syrup creates a rich, caramel‑like sweetness that lingers on the palate, while the vanilla extract adds a subtle floral note that ties everything together. The optional chocolate chips deliver a satisfying bite of bittersweetness without overpowering the base.
- Texture: Rolled oats provide a hearty chew, protein powder gives a smooth, protein‑packed feel, and chia seeds introduce a gentle crunch that keeps each bite interesting. The result is a bar that is firm enough to hold its shape yet soft enough to bite into comfortably.
- Simplicity: No baking, no complicated equipment—just a saucepan, a spoon, and a pan. The recipe requires only seven ingredients, all of which can be found in most pantry staples or a quick grocery run.
- Uniqueness: The subtle infusion of chia seeds and the choice of maple syrup over refined sugar set this recipe apart from standard protein bars that often rely on artificial sweeteners.
- Crowd Reaction: Friends and family consistently ask for the recipe after tasting one bar, claiming it’s “the best protein bar they’ve ever had.” The bars are perfect for parties, road trips, or a quick post‑workout pick‑me‑up.
- Make‑ahead Potential: The bars can be prepared in bulk and stored for up to a week in the refrigerator or frozen for months, making them ideal for meal prep or for keeping on hand during busy weeks.
Inside the Ingredient List
The Flavor Base
Rolled oats are the backbone of this bar, providing a hearty, chewy texture that keeps the bars from falling apart. They are also a great source of complex carbohydrates and fiber, which help maintain steady energy levels. If you prefer a finer crumb, rolled oats can be replaced with quick oats, but the texture will be slightly softer. Choosing certified gluten‑free oats is essential for those with celiac disease or gluten sensitivity.
The Texture Crew
Nut butter—whether peanut, almond, or cashew—acts as the glue that binds all the ingredients together. It also adds healthy fats and a creamy mouthfeel. If peanut butter is your go‑to, a smooth variety works best; if you’re feeling fancy, a crunchy almond butter gives a subtle pop. The amount of nut butter can be adjusted to tweak the firmness of the bars.
The Unexpected Star
Maple syrup is the sweetener that brings warmth and depth. Unlike refined sugar, maple syrup contains minerals such as manganese and zinc, adding a nutritional boost. A pinch of sea salt can be added to enhance the overall flavor profile, but it’s optional. If you prefer a vegan alternative, agave nectar works well, though it’s slightly sweeter.
The Final Flourish
Protein powder provides the essential muscle‑building component, and its flavor can be tailored to your taste—vanilla for a classic bar or chocolate for a decadent treat. Dark chocolate chips add a luxurious finish and a hint of bitterness that balances the sweetness. Chia seeds contribute omega‑3 fatty acids and a pleasant crunch; if you’re allergic or simply don’t like the texture, they can be omitted without compromising the bars’ structure.
Everything's prepped? Good. Let's get into the real action...
The Method — Step by Step
- In a medium saucepan, combine the rolled oats, nut butter, maple syrup, and vanilla extract. Warm over medium heat, stirring constantly, until the mixture becomes smooth and glossy. The mixture should thicken slightly and emit a warm, nutty aroma. Keep a close eye on the heat; you want it heated, not scorched. When it’s ready, set the saucepan aside to cool slightly.
- Remove the saucepan from heat and fold in the protein powder, dark chocolate chips, and chia seeds. Stir vigorously until all ingredients are fully incorporated and the mixture is homogenous. The batter should be thick enough to hold its shape when pressed into a pan. If it feels too dry, add a splash of milk or water to achieve the desired consistency. This step is critical for ensuring the bars hold together.
- Line an 8‑inch square baking pan with parchment paper, leaving an overhang for easy removal. Transfer the mixture into the pan, spreading it evenly with a spatula or the back of a spoon. Press firmly so the bars will hold together when cut. A level surface helps the bars set evenly. If you’re feeling meticulous, tap the pan lightly to remove any air pockets.
- Chill the pan in the refrigerator for at least 30 minutes, or until the mixture is firm and set. Once set, lift the parchment overhang and place the slab on a cutting board. The bars should now be solid enough to slice cleanly. If the bars feel too soft, give them a few more minutes in the fridge.
- Cut the slab into 12 equal bars using a sharp knife, wiping the blade between cuts for clean slices. The bars should hold together without crumbling. If you find the edges are too sticky, lightly dust them with a bit more oats. Watch Out: If you add too much maple syrup, the bars can become overly sticky and difficult to cut, so measure carefully.
- Store the bars in an airtight container at room temperature for up to 3 days, or refrigerate for up to a week. For longer storage, freeze the bars and thaw before eating. If you prefer a cooler bite, you can refrigerate them for a short time before serving. The texture will slightly soften in the fridge, making them more like a chewy cookie.
- Serve immediately or keep them in the fridge for a refreshing snack. The bars are best eaten within a few days of preparation for maximum freshness. If you prefer a cooler bite, you can refrigerate them for a short time before serving. Enjoy the bars as a post‑workout fuel, a mid‑morning pick‑me‑up, or a sweet treat after dinner. Remember to keep an eye on the texture; if it feels too dry, add a splash of milk or water before refrigerating.
Insider Tricks for Flawless Results
The Temperature Rule Nobody Follows
Many people bake protein bars at high heat, which can burn the sugar and create a bitter taste. In this no‑bake version, we keep the heat low, just enough to melt the butter and syrup without scorching. This subtle temperature control preserves the natural flavors and keeps the bars from developing a burnt edge. If you accidentally overheat, the mixture may separate, making it hard to form bars.
Why Your Nose Knows Best
The aroma of toasted oats and melted butter is a reliable indicator of readiness. When the mixture smells nutty and slightly caramelized, you’re ready to add the dry ingredients. A strong, sweet scent signals that the syrup has fully integrated. Trust your nose—it’s your best friend in the kitchen.
The 5-Minute Rest That Changes Everything
After adding the protein powder, let the mixture rest for five minutes before pressing it into the pan. This brief pause allows the protein to hydrate fully, preventing clumping. It also gives the oats a chance to absorb the moisture, resulting in a smoother texture. I’ve tried skipping this step once, and the bars ended up uneven.
Chia Seeds: The Silent Strengthener
Chia seeds swell when they come into contact with the wet mixture, creating a natural thickening agent. They also add a subtle crunch and a boost of omega‑3 fatty acids. If you’re allergic or simply don’t like the texture, you can omit them, but the bars will still hold together. For a crunchy variation, add a handful of crushed nuts instead.
Optimal Cutting Technique
Always use a fresh, sharp knife for cutting the bars. A dull blade can cause the bars to crumble, ruining the presentation. A chilled knife, as mentioned earlier, reduces friction and yields cleaner cuts. If you’re making a large batch, consider using a cookie cutter for uniform shapes.
Creative Twists and Variations
Nutty Berry Bliss
Swap the dark chocolate chips for a handful of dried cranberries and add a tablespoon of almond butter. The tartness of the cranberries balances the sweetness, and the almond butter adds a subtle nutty undertone. This version is perfect for those who crave a fruity twist.
Spicy Choco‑Nut
Introduce a pinch of cayenne pepper or smoked paprika to the mixture for a subtle heat. Complement it with dark chocolate chips to keep the richness. The spice adds depth, making the bars a conversation starter at any gathering.
Minty Matcha Delight
Stir in a teaspoon of matcha powder and replace the vanilla extract with peppermint extract. The green tea flavor pairs beautifully with the nutty base, while the peppermint adds a refreshing finish. This variation is ideal for a springtime snack.
Coconut Coconut
Use shredded coconut as a topping and replace the nut butter with coconut butter for a tropical vibe. The coconut adds a chewy texture and a distinct aroma that transports you to a beach. This version works well for beach trips or tropical-themed parties.
Peanut Butter & Honey Crunch
Swap maple syrup for honey and add a handful of chopped peanuts for an extra crunch. The honey’s floral notes complement the peanut butter, while the peanuts add a satisfying bite. This classic combo is a crowd‑pleaser at game nights.
Chocolate‑Mint Swirl
Drop in a tablespoon of cocoa powder and a few drops of mint extract. Fold in a swirl of dark chocolate chips for a chocolate‑mint explosion. This variation is a decadent treat for chocolate lovers.
Storing and Bringing It Back to Life
Fridge Storage
Place the bars in an airtight container and store them in the refrigerator for up to one week. The cold environment keeps the bars firm and prevents mold growth. If the bars feel too dry, sprinkle a tiny splash of water on top before sealing the container.
Freezer Friendly
For long‑term storage, wrap each bar individually in parchment paper and place them in a freezer bag. They can last up to three months in the freezer. Thaw at room temperature for 15 minutes before enjoying, or pop them in the microwave for 10–15 seconds to revive the texture.
Best Reheating Method
To warm the bars, place them in a microwave-safe container and heat on medium power for 10–15 seconds. The bars will soften slightly, making them easier to bite. Avoid over‑heating, which can cause the chocolate to separate.